
Quick Start Guide
Getting Around
Meet the Directional Pad:
 | You control the Leaf with this 5-way switch by pressing UP, DOWN, LEFT, RIGHT, and CENTER |
 | Turn Leaf ON and OFF by holding CENTER |
 | Use LEFT and RIGHT to scroll through the pages |
All the way to the right you’ll find the MENU page:
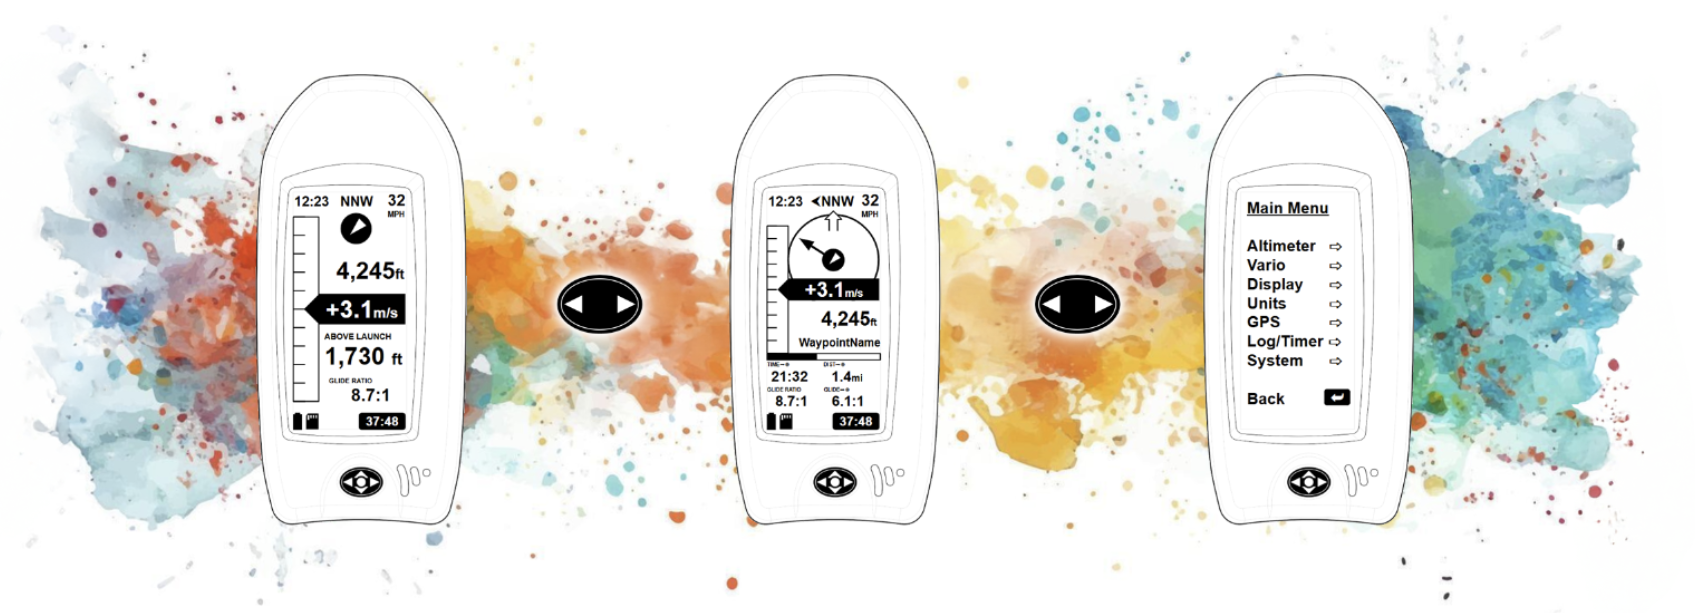
 | Within a page, use UP and DOWN to scroll through the options |
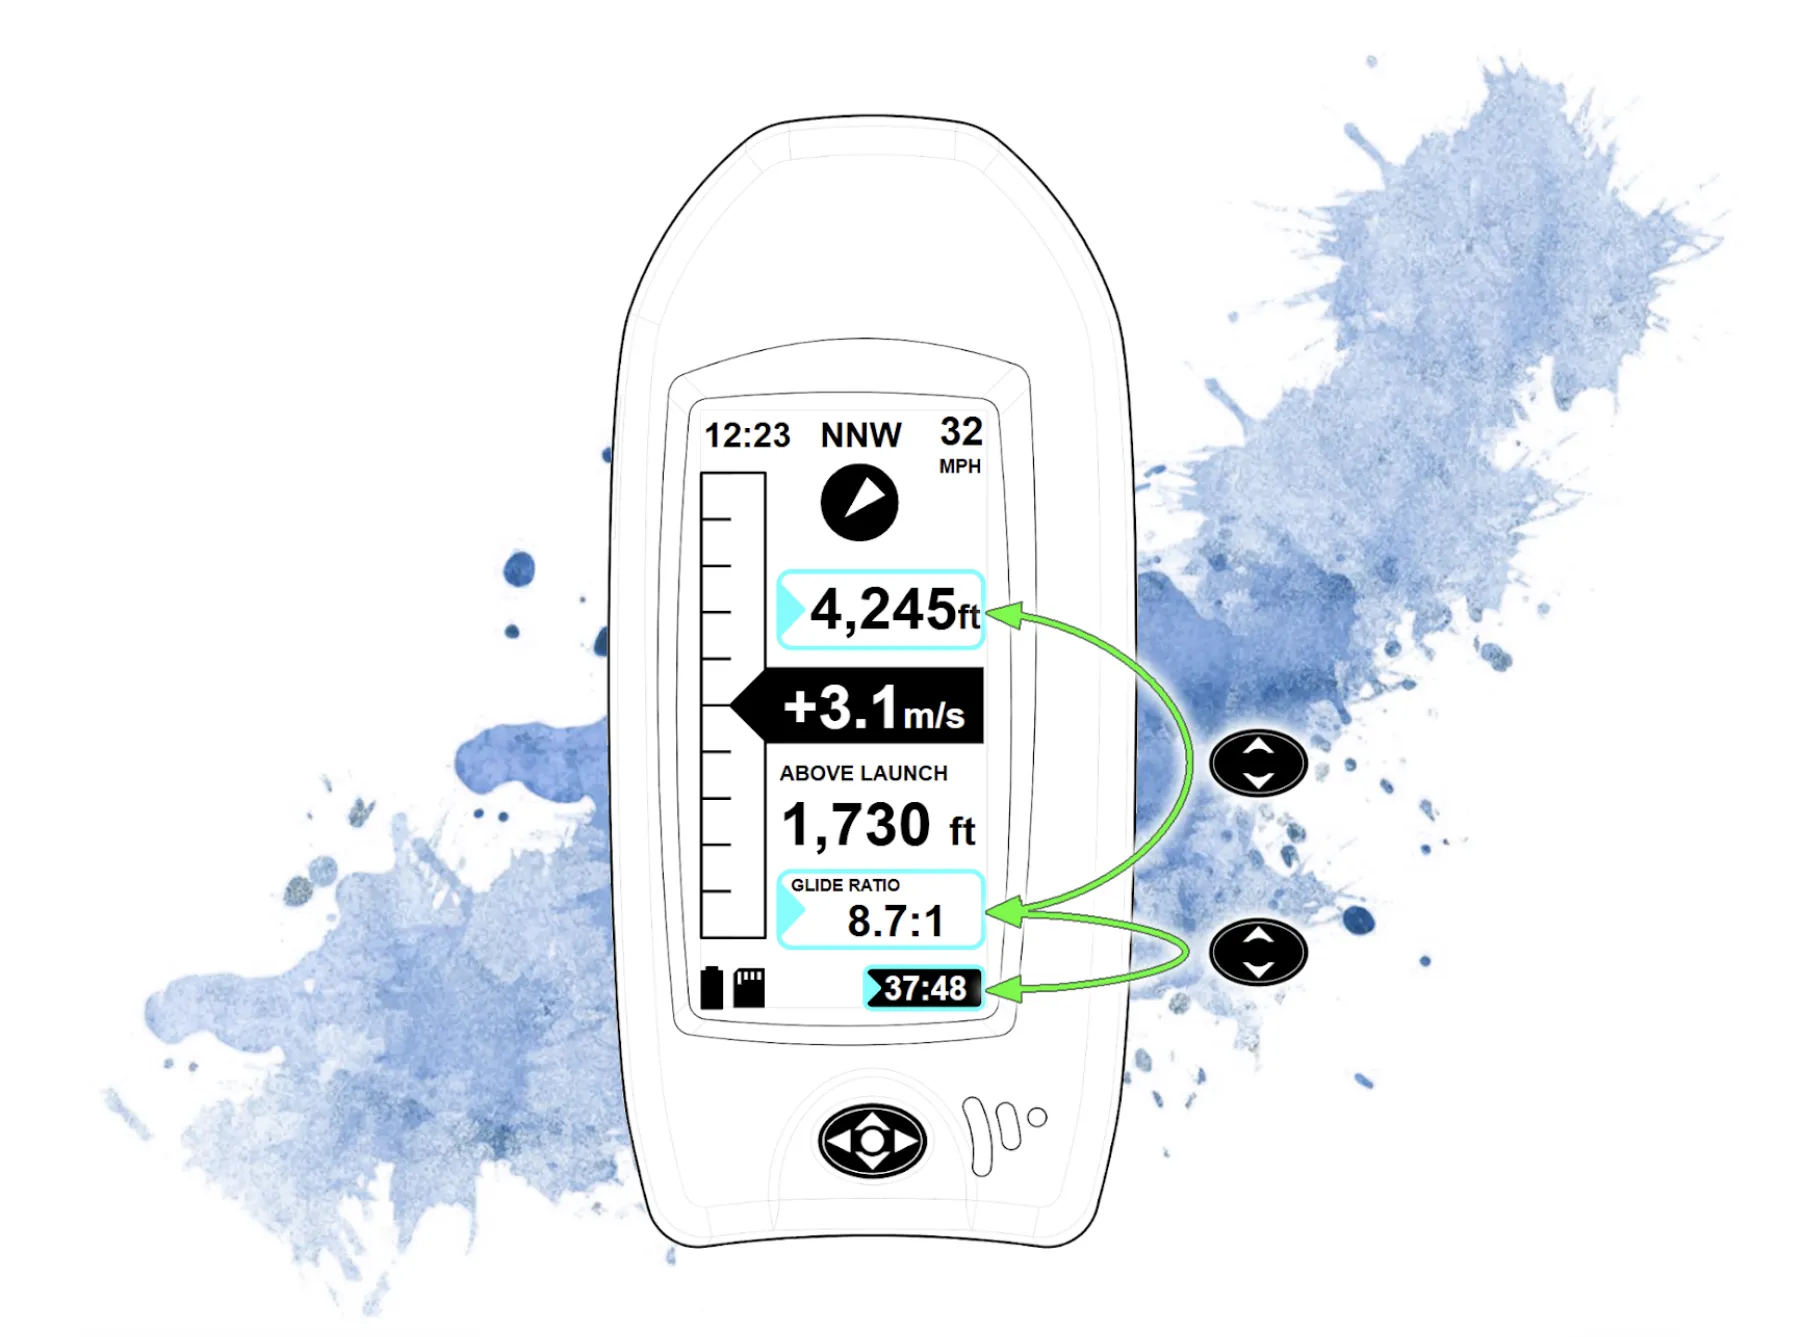
 | A cursor selection box will highlight adjustable fields. If no button is pushed for about 5 seconds, the cursor will disappear. This prevents accidental adjustments to your Leaf. |
| When selected, press CENTER to select or adjust that option |
Examples
Manually starting and stopping the flight timer:
- Press UP to select the timer. Press CENTER to start the timer.
- If the timer is running, press UP to select the timer, then hold CENTER for a few seconds to stop the timer.
Switching between GPS and Pressure Altitude:
- Press UP or DOWN as needed to select the altitude field. Press CENTER to switch between GPS and Pressure Altitude.
The selection cursor wraps around from top to bottom. When nothing is selected on a page or menu, press DOWN to reach items near the top faster, or press UP to reach items near the bottom faster.
| In a few cases, you can use LEFT and RIGHT on an option as well. For example:
|
Shortcut: When MSL Altitude is selected, hold CENTER to sync the baro altitude to the GPS altitude. This is useful if you don’t know the site altitude or current pressure setting. (Requires a GPS fix.)
User Page
This is the main operational page for standard vario information
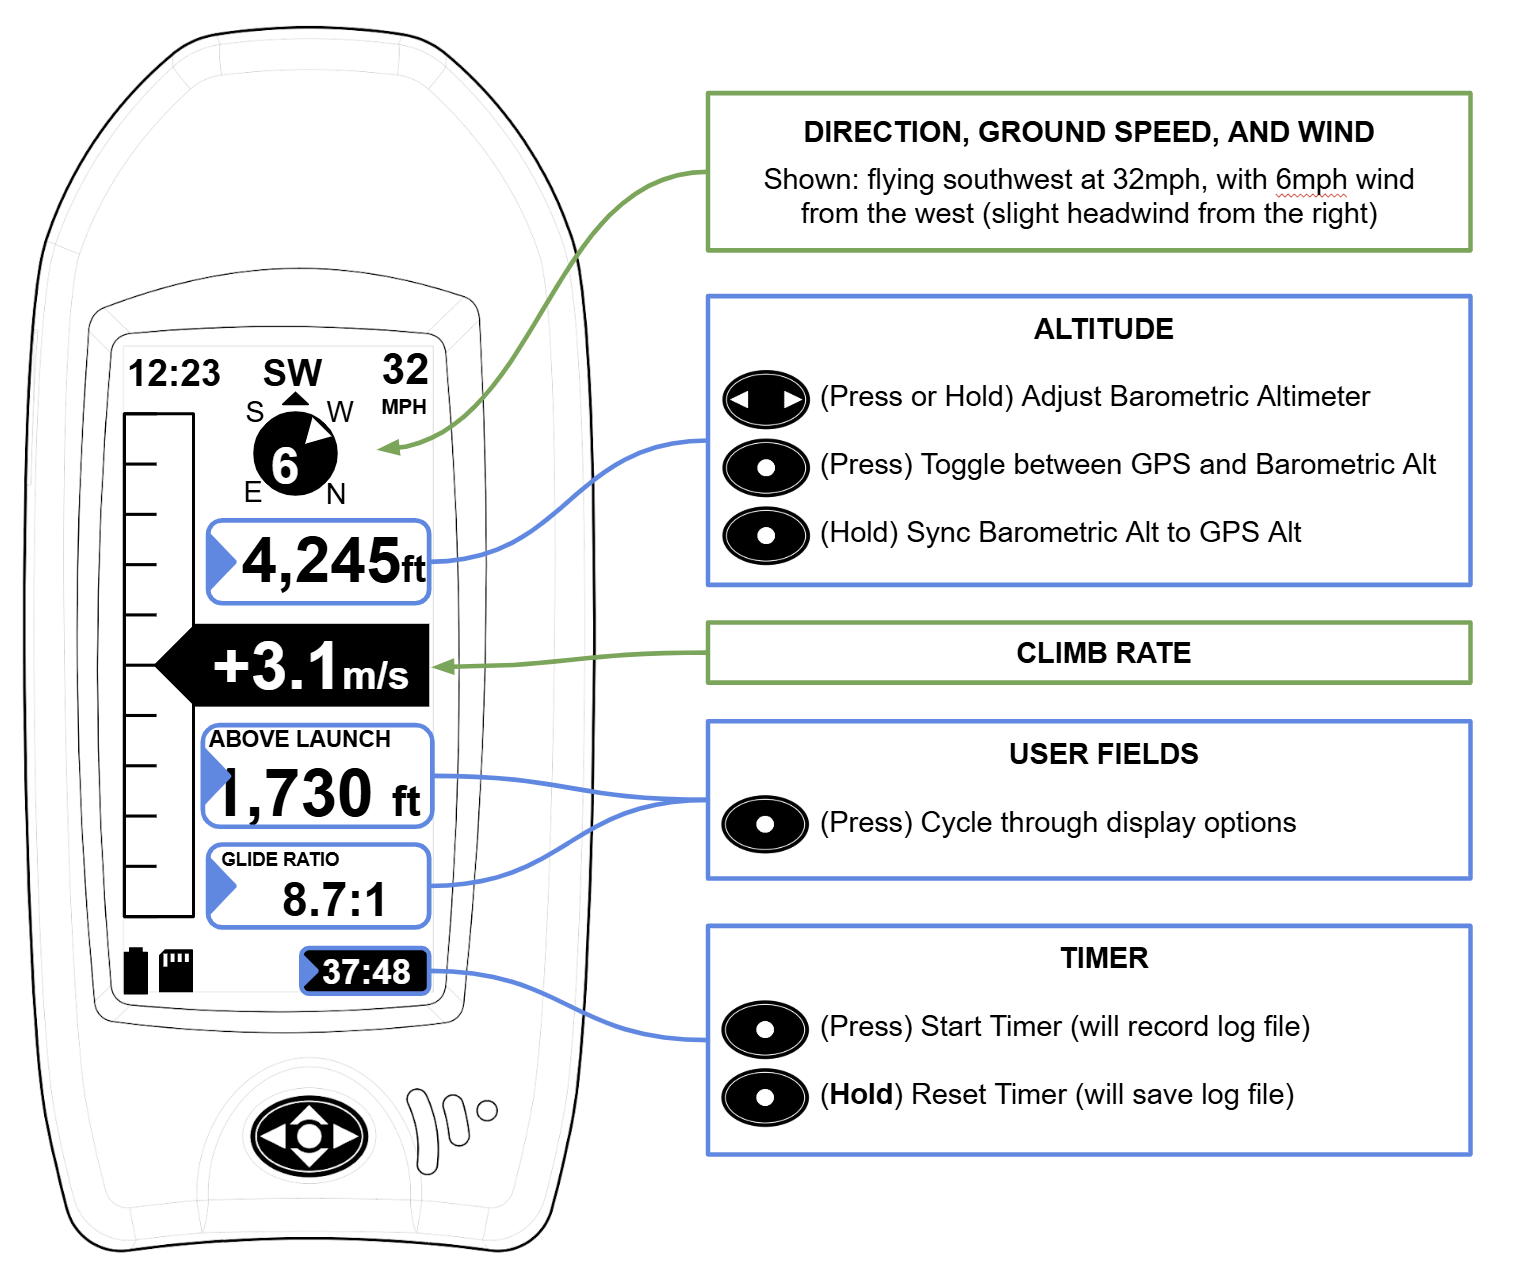
Blue are fields that can be adjusted; Green is fixed information
Nav Page
The Nav Page is used when tracking to GPS waypoints or routes
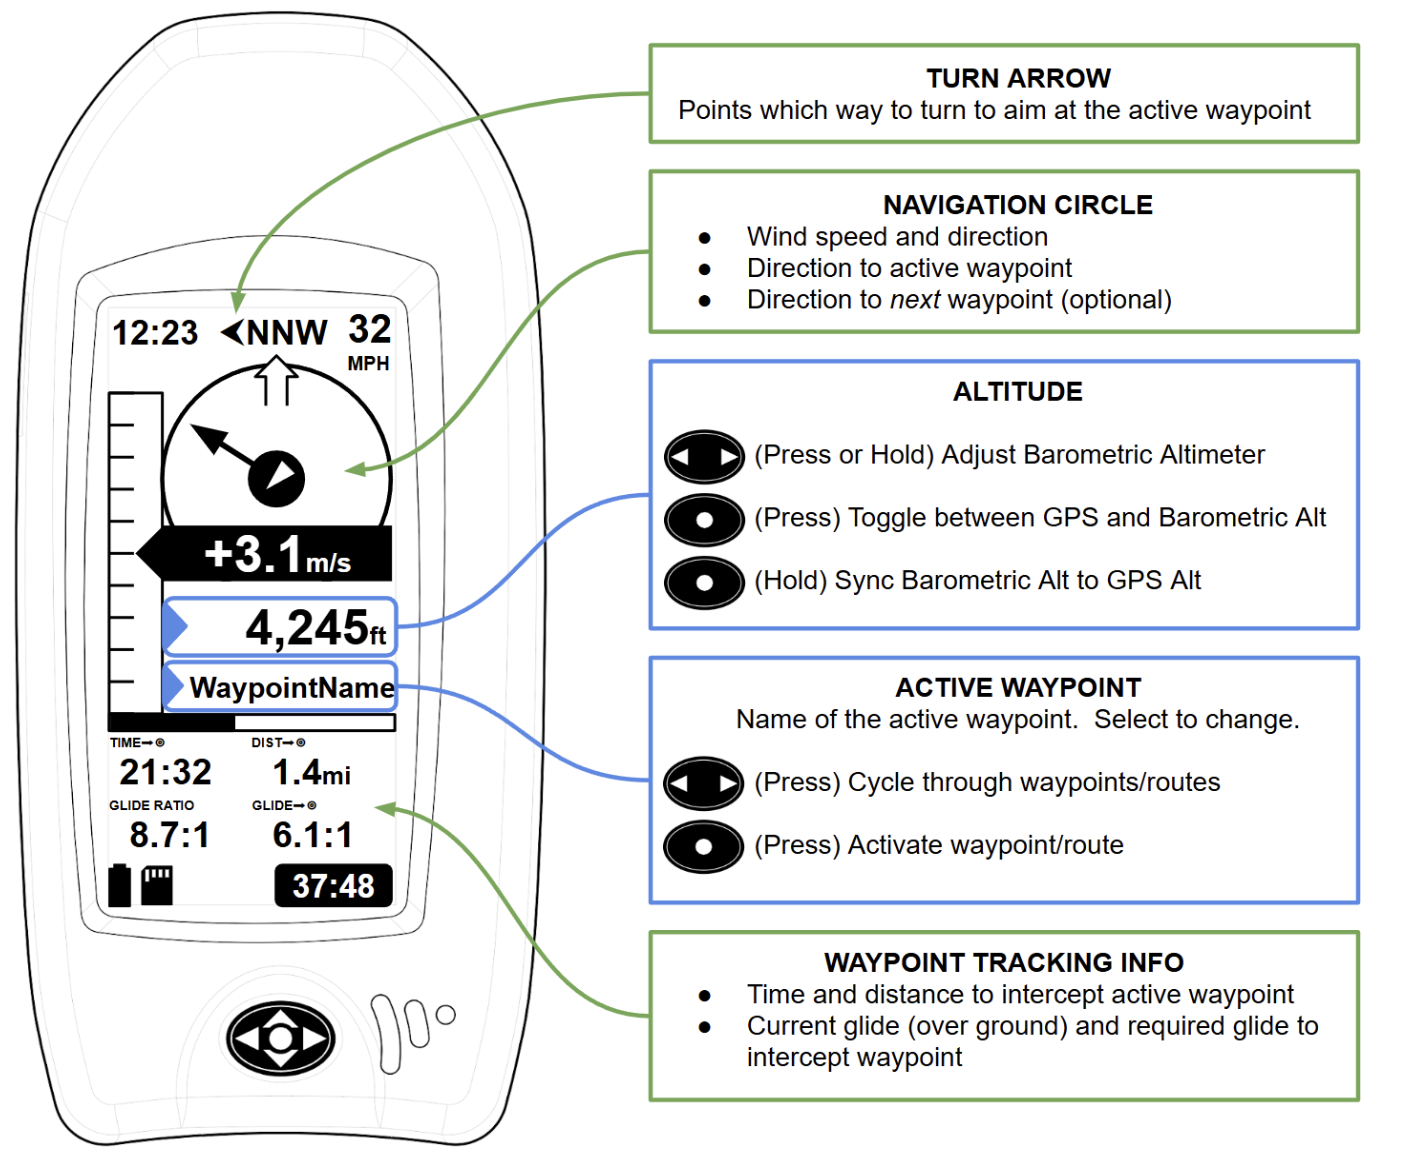
Blue are fields that can be adjusted; Green is fixed information
Before Your First Flight
- Fully charge Leaf using a USB-C cable.
- Read the liability waiver included with Leaf. Leaf will ask you to accept it the first time you turn it on. You can disable this reminder later in Menu → Settings → System.
- Explore the menu and adjust your preferences. We recommend turning on Vario → QuietMode and Logging → AutoStart, and setting your local time zone in Settings → System.
- Mount Leaf using the Velcro strap or base plate, and always attach the lanyard.
- Test Leaf on the ground before flying.
First GPS fix: Leaf may take 10-15 minutes to acquire its first GPS fix. Place it outside with a clear view of the sky. Subsequent fixes should be faster after initial satellite data is saved.
Stay connected: We love hearing feedback, ideas, and flight experiences. Chat with us on Discord or Email.
Thank you for supporting open-source flight instruments.
Fly safe and enjoy the adventure!
Menu Options
The Leaf menu is the last main page. Scroll → right through the pages to open it. When you enter the menu, Leaf will try to auto-connect to any known saved WiFi networks. You will see the connection status at the top.

Shortcut: To quickly exit the menu, press LEFT on most menu options to go back or exit.
Main Menu
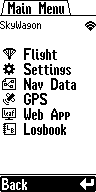
- WiFi Status: Leaf will show network name and connection status.
- Flight: Quick-access settings you may wish to change just before or during a flight.
- Settings: Adjust settings and preferences, and enable or disable features.
- Nav Data: Select waypoint and route files for navigation.
- GPS: View GPS fix quality, satellite positions, and current coordinates.
- Web App: Open the Leaf Web App on a phone or computer.
- Logbook: Review saved flight summaries.
Flight Page
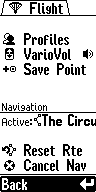
- Profiles: Select the active pilot and glider profiles to save in the logbook.
- VarioVol: Adjust the volume of the vario beeps.
- Save Point: Save your current location to user waypoints and, if recording, mark a point of interest in the IGC log file.
Navigation options: The following options are only shown if Leaf is currently navigating, or was previously navigating, to a waypoint or route.
- Resume Rte / Resume Pt: Resume navigation to the previous route or waypoint.
- Reset Rte / Restart Rte: Start the active or previous route again from the first waypoint.
- Cancel Nav: Stop actively navigating to the current waypoint.
Settings Menu
Below is an overview of available Leaf settings. For full descriptions of each one, please see the Settings Submenus section further below.
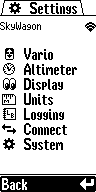
- Vario: Adjust audio feedback and climb/sink thresholds.
- Altimeter: Sync or adjust barometric altitude.
- Display: Choose visible pages and tune screen contrast.
- Units: Choose altitude, speed, distance, temperature, and time units.
- Logging: Configure IGC logging and automatic start/stop behavior.
- Connect: Configure WiFi and Bluetooth features.
- System: Set time zone, volume, auto-off, firmware updates, and reset options.
Nav Data Page
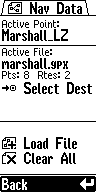
- Active Point/Route: Shows the current navigation destination.
- Active File: Shows the waypoint or route file currently loaded.
- Pts / Rtes: Shows how many points and routes were found in the loaded file.
- Select Dest: Opens the list of available destinations.
- Load File: Loads a waypoint or route file from the SD card.
- Clear All: Unloads the current navigation data without deleting files from the SD card.
GPS Menu
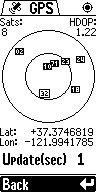
- Status icon: Shows a solid dot when Leaf has a GPS fix. Otherwise, it blinks and shows the current satellite count while searching for a fix.
- Sats: Shows how many satellites are used in the current fix.
- HDOP: Shows fix quality. Lower is better; below 2 is generally good.
- Sky view: Shows satellite positions in the sky, with north at the top. The center of the circle is directly overhead.
- Lat / Lon: Shows current GPS coordinates.
- Update(sec): Shows how often the GPS position is updated. This is currently fixed at 1 second. In the future we may allow slower update cycles for battery savings.
Web App Page
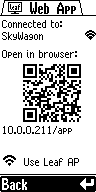
- Connected to: Shows the WiFi network Leaf is using.
- QR code: Scan with a phone to open the Leaf Web App.
- Address: Type the shown address into a browser if you are not using the QR code.
- Use Leaf AP: Switches to Leaf’s own WiFi network when you are away from saved WiFi.
If Leaf is not connected to a local WiFi network, it will automatically open the Leaf Web App in Access Point (AP) mode. Use your phone’s WiFi settings to connect to the Leaf network, then open the Web App.
Logbook Page
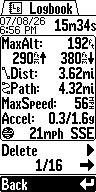
- Flight Summary: Shows the date, time, and duration of the flight.
- Flight Metrics:
- Max altitude, climb, and sink
- Distance between start and end points
- Distance flown along the flight path
- Max groundspeed
- Min and max acceleration (g force)
- Max observed wind speed, if an estimate was captured during the flight
- Delete: Erases the log summary as well as any recorded IGC flight track.
- Page Number / Total: Scroll LEFT and RIGHT through all logbook entries.
Settings Submenus
Vario Settings
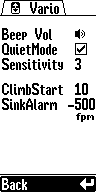
- Beep Vol: Sets the climb and sink audio volume.
- QuietMode: Mutes vario beeps until a flight log is started.
- Sensitivity: Controls how quickly the vario responds. Higher values feel more immediate.
- ClimbStart: Sets the climb rate needed before climb beeps begin.
- SinkAlarm: Sets the descent rate needed before the sink alarm sounds.
Altimeter Settings
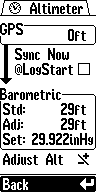
- GPS Alt: Shows current GPS altitude when Leaf has a GPS fix.
- Sync Now: Immediately sets the barometric altitude equal to GPS altitude.
- @LogStart: Performs an altimeter sync when a flight log starts.
- Baro (Std): Altitude MSL using the 29.92 inHg standard pressure setting.
- Baro (Adj): Altitude MSL using the current pressure setting.
- Set: Current pressure setting value.
- Adjust Alt: Press or hold LEFT/RIGHT to adjust the pressure setting.
Display Settings
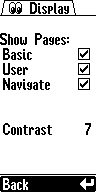
- Show Pages: Choose which flight pages are available as you scroll left and right.
- Basic: Shows the simplified thermal page.
- User: Shows the thermal page with configurable user fields.
- Navigate: Shows the GPS navigation page.
- Contrast: Adjusts the screen contrast for current lighting and temperature.
Units Settings
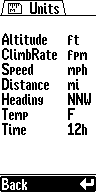
- Altitude: Feet or meters.
- ClimbRate: Feet per minute or meters per second.
- Speed: Miles per hour or kilometers per hour.
- Distance: Miles/kilometers, with shorter distances shown in feet/meters.
- Heading: Compass directions or degrees from north.
- Temp: Fahrenheit or Celsius.
- Time: 12-hour or 24-hour time.
Logging Settings
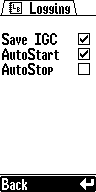
- Save IGC: Saves an IGC track file while the flight timer is running and GPS has a fix.
- AutoStart: Starts logging automatically after Leaf detects launch-like motion and speed for at least 5-8 seconds.
- AutoStop: Stops logging automatically after landing-like stillness is detected for at least 20 seconds. An alert will pop up when the log is 10 seconds from stopping, allowing you to push a button or shake Leaf to keep the log running.
Connect Settings
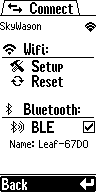
- WiFi Setup: Creates the Leaf setup network so you can save WiFi credentials.
- See Connect to WiFi for more details.
- WiFi Reset: Clears saved WiFi networks.
- BLE: Enables Bluetooth Low Energy for sharing flight data with compatible apps.
- Name: Shows the Bluetooth device name advertised by Leaf.
System Settings
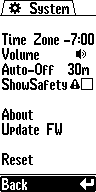
- Time Zone: Sets the local time zone used for the display clock and log file create/start/end times. Press CENTER to switch to adjusting the time zone in 15 minute increments. Press CENTER again to switch back to hour increments.
- Volume: Sets system alert, button, and notification volume.
- Auto-Off: Turns Leaf off after inactivity when no log is running.
- ShowSafety: Shows or hides the startup safety disclaimer.
- About: Shows firmware and device information.
- Update FW: Checks for and installs firmware updates over WiFi.
- Reset: Hold CENTER to reset Leaf settings without erasing the SD card or flight logs.
SD Card & Logging

Accessing the SD card
Leaf functions as a mass-storage device. Simply plug it in to any computer or smartphone and you should see a “LEAF VARIO” drive appear with the SD card contents. Note: a second drive may also appear with the firmware files. This can be ignored as it is only used for the rare occasion when you may wish to manually update the firmware.
Saving Track Logs
Flight logs will save to the SD card. Be sure to turn on the “Save IGC File” setting inside the Log Menu.
Track logs are saved in IGC format.
Files and Folders
Leaf will create folders and files on the SD card as you use different features:
- tracks/ Stores recorded IGC flight track files.
- logbook/ Stores flight summary files used by the Logbook page and Leaf Web App. These summaries reference the matching track files in tracks/ when an IGC track was recorded.
- waypoints/ Stores waypoint files for navigation. You can place GPX, CUP, WPT, and WYP files here. Leaf also stores saved user waypoints in waypoints/user_waypoints.json.
- routes/ Stores route files created or imported on Leaf or in the Leaf Web App. Leaf may also use routes/active.json to remember the currently active route.
- profiles/ Stores pilot and glider profile information, such as profiles/profiles.json, after profiles are edited in the Web App.
- firmware/ Stores firmware files and update status messages for manual firmware updates via the SD card.
- diagnostics/ May appear when diagnostic features are enabled or troubleshooting information is saved.
Navigation
Waypoint and Route Files
Leaf can load waypoint and route files from the SD card. Save navigation files in the waypoints folder on the “LEAF VARIO” drive. Leaf accepts GPX, CUP, WPT, and WYP files. GPX files may contain waypoints, routes, or both.
Loading and Activating Files
On Leaf, open Main Menu → Nav Data → Load File, then choose the file you want to use.
After a file is loaded, the Nav Data page shows the active file name and the number of points and routes found. Use Clear All to unload the current navigation data.
Selecting a Route or Point
Open Main Menu → Nav Data → Select Dest to choose a waypoint or route from the loaded file.
When a destination is selected, Leaf shows it under Active Point/Route, and the Nav Page will guide you toward the active waypoint. If you select a route, Leaf starts from the first waypoint in the route and advances through the route as you fly.
When you select a route from a GPX file, or create or import a route from the Leaf Web App, Leaf automatically creates and saves a route file in the routes folder on the SD card. Saved routes can be loaded again later from Main Menu → Nav Data → Load File.
Quick Access
Shortcut: Open Main Menu → Flight to resume, reset, or cancel navigation without going back through the Nav Data menu.
Shortcut: On the Nav Page, scroll up to the destination field, then press LEFT or RIGHT to move through available navigation points. Press CENTER to select one as the new destination. This is especially useful while navigating a route if you want to skip ahead or go back to a previous point.
Connect to WiFi
Connect Leaf to a local WiFi network for firmware updates, log uploads, and easier access to the Leaf Web App. To connect, start the setup process on Leaf, then finish connecting on your phone, as shown below.
Leaf requires a 2.4 GHz WiFi network. It is not compatible with 5 GHz-only networks. If your router uses separate network names for each frequency, select the 2.4 GHz network.
Start WiFi setup on Leaf
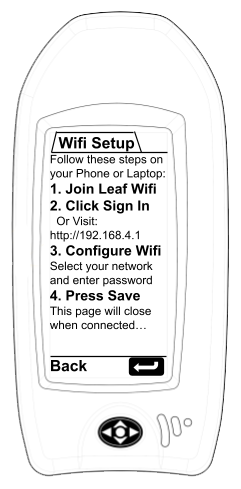
- On Leaf, open Main Menu → Settings → Connect → WiFi Setup.
- Leaf will create its own temporary WiFi network named Leaf followed by four characters, similar to Leaf-AB12.
- Leave Leaf on the setup screen while you use a phone, tablet, or computer to finish the setup.
Save your network from a phone or computer
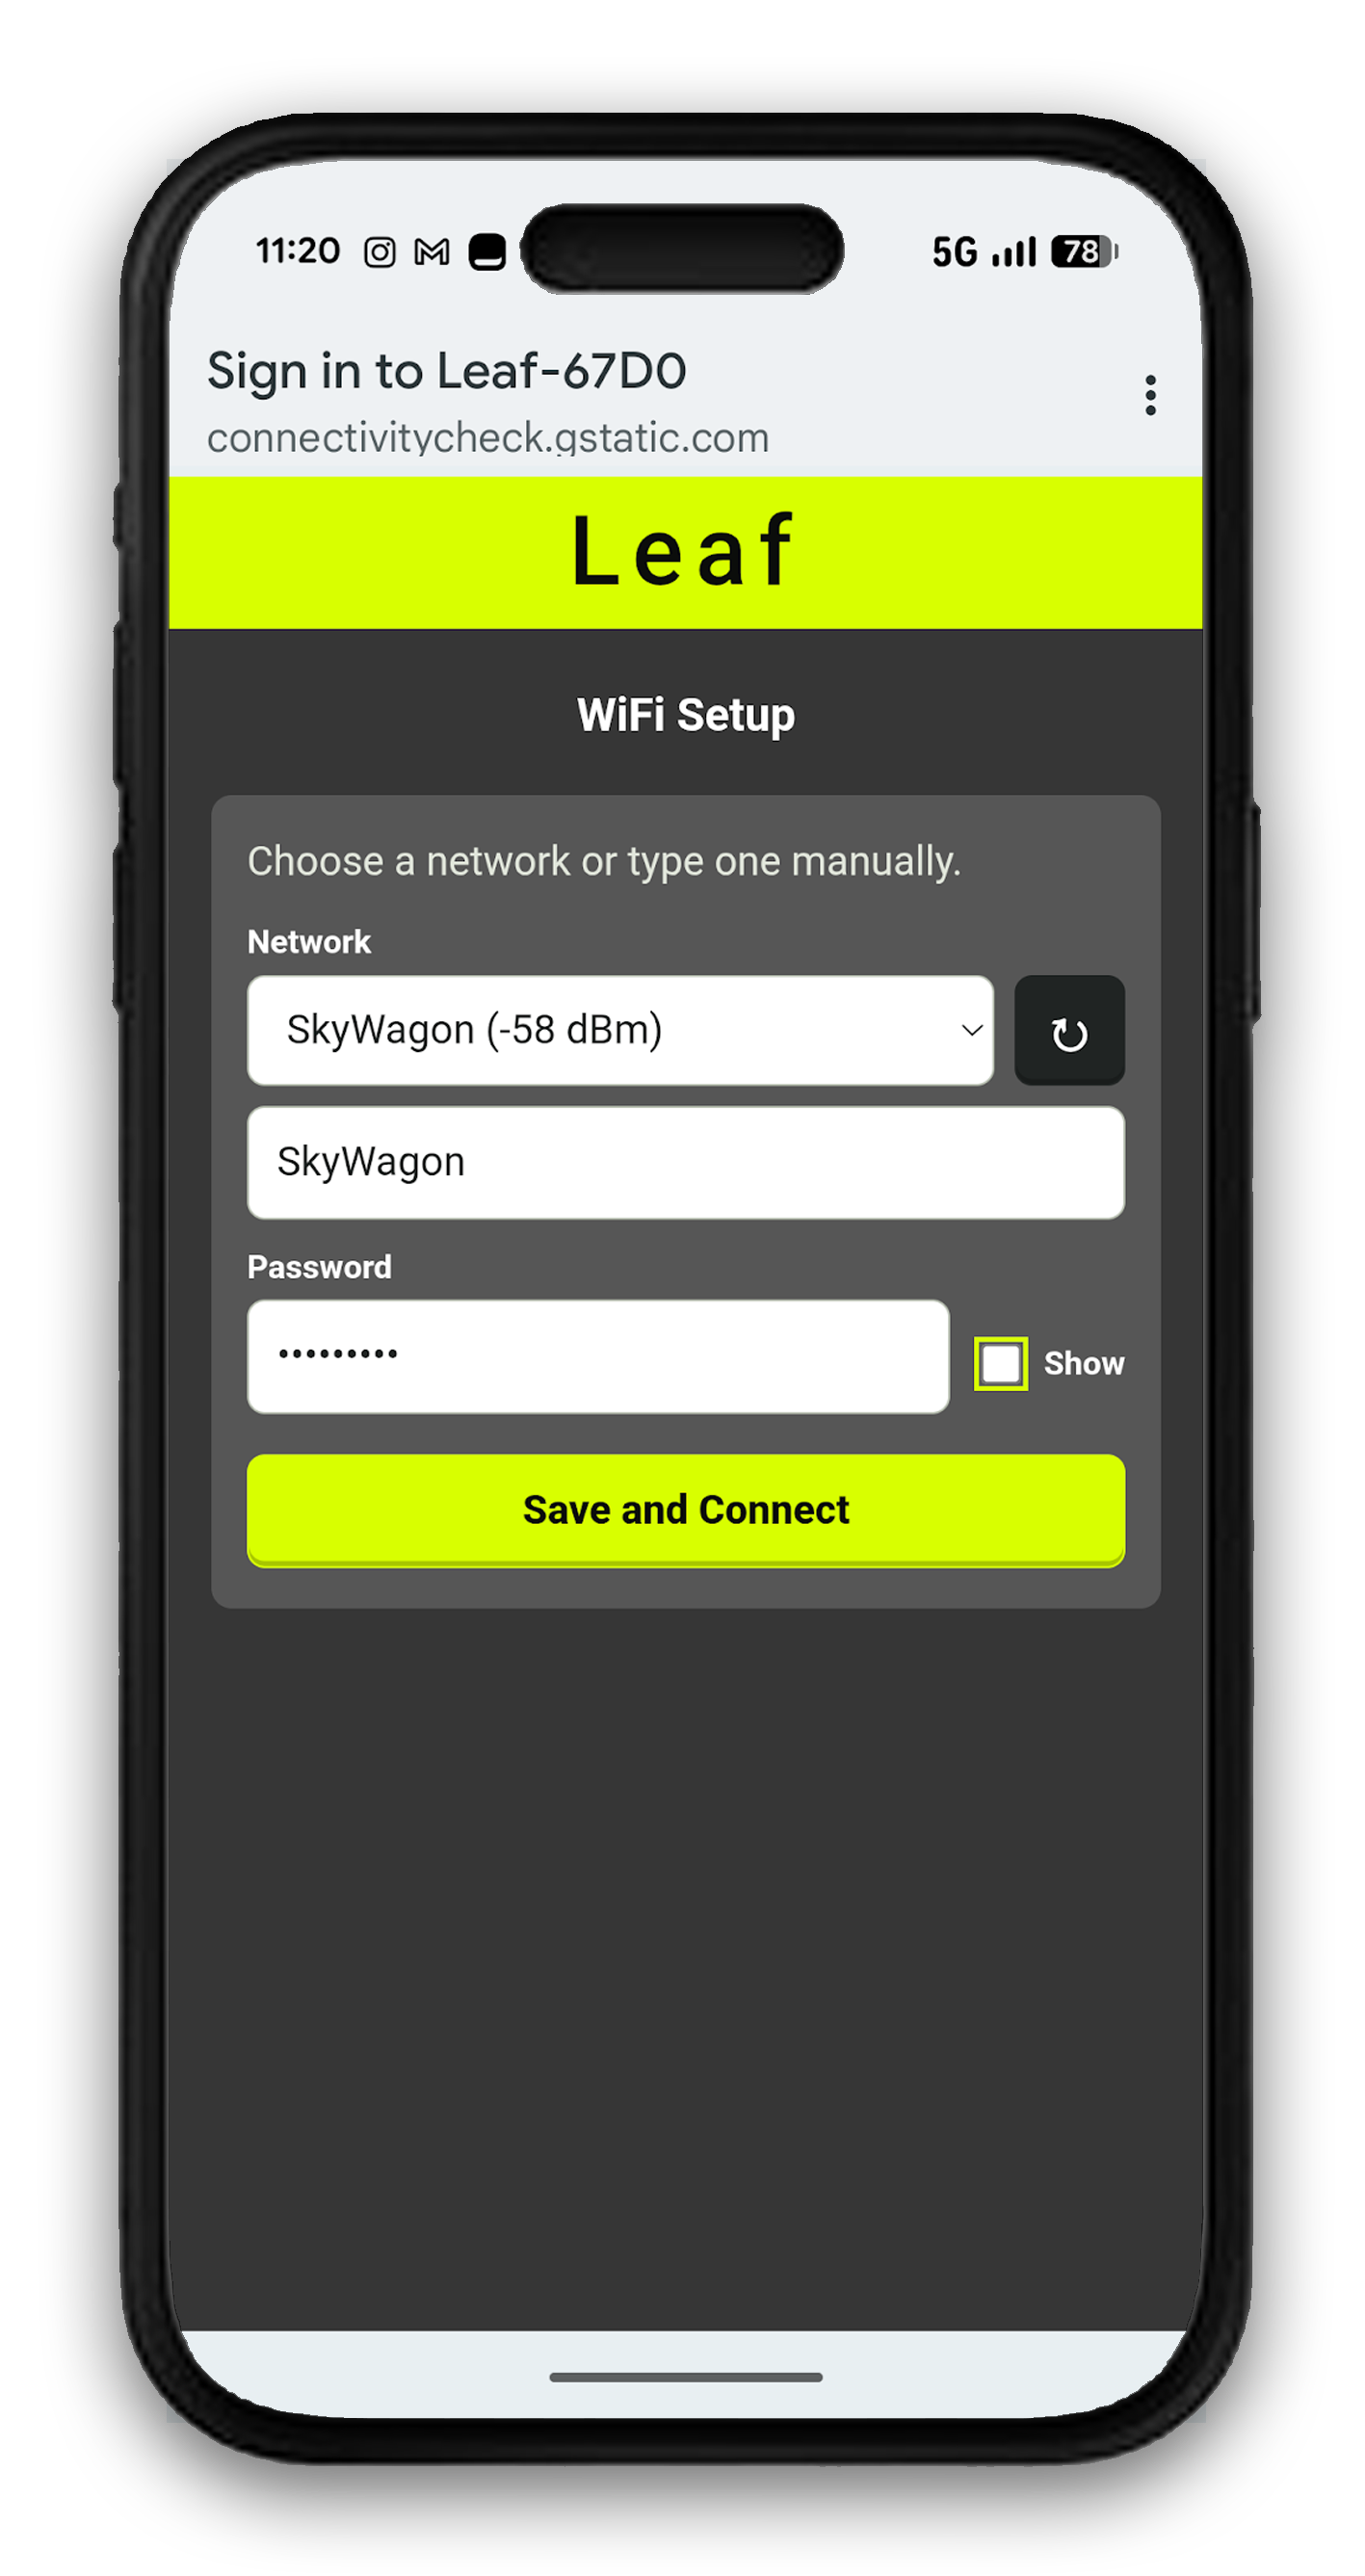
- Open WiFi settings on your phone or computer and join the Leaf network shown on the Leaf screen, using the password shown on Leaf.
- The Leaf setup page should open automatically. If it does not, tap the “Sign in to Leaf WiFi” prompt or visit 192.168.4.1.
- Select your WiFi network from the list, or type the network name manually.
- Enter the password carefully. Network names and passwords are case-sensitive.
- Save the settings. Leaf will leave setup mode and try to connect to the saved network.
After a successful connection, Leaf will save that network and try to reconnect automatically every time you open the Leaf menu. Leaf will save up to three of your last-used networks. You may wish to save your phone’s hotspot network into Leaf as well, so you can use WiFi features out in the field.
When Leaf is connected to a network with internet access, you will be able to check for firmware updates, access the Leaf Web App from any device on that network, and support future online logbook upload features.
Connecting to a Phone Hotspot
If a WiFi network is not currently available, but you need to use internet-required features on Leaf such as checking for firmware updates or uploading logs, you can connect Leaf to your phone’s hotspot.
Remember that for local Leaf Web App functions, like editing waypoints/routes and viewing your logbook, you do not need internet or a hotspot. You can have your phone connect to Leaf directly.
To connect to your phone’s hotspot network for internet access, follow this process:
-
Turn on and configure the WiFi hotspot feature on your phone/device. Be sure to remember the hotspot network name and password.
-
Follow the Connect to WiFi steps to connect to the Leaf network and open the WiFi setup page on your phone/device.
Note: Connecting to the Leaf network on your device may automatically turn off your hotspot feature. If this happens, it is okay.
-
Enter your hotspot network and password information into the WiFi setup page. If your hotspot did turn off, you may have to type the name manually instead of selecting it from the list.
-
Immediately after clicking “Save and Connect”, turn your device’s hotspot feature back on if needed.
-
Leaf will try to connect to the hotspot network and save it for future use.
-
To reconnect in the future, simply turn on your hotspot feature before opening the Main Menu on Leaf. When the Main Menu page opens, Leaf will automatically try connecting to every saved network, including your hotspot.
-
If you have trouble connecting Leaf to your hotspot, try using an additional device as described in the iPhone note below:
iPhone hotspot note: Connecting Leaf to an iPhone hotspot may require another device, such as a tablet, laptop, or a friend’s phone. Turn on your iPhone hotspot and set it aside, then use the other device to follow the Connect to WiFi steps and select the iPhone hotspot as the network Leaf should join.
WiFi Troubleshooting
Having issues connecting Leaf to WiFi networks? You can try the following:
- Try the WiFi setup process again, and make sure you are using the correct network name and password.
- Try rebooting Leaf by turning it off and on again. Leaf needs to be unplugged from a charger during this process for a proper reset.
- Fully reset WiFi settings by selecting Settings → Connect → WiFi Reset. Then try connecting again. Warning: this will erase all previously saved networks.
- If Leaf does not reconnect to a previously used WiFi network, it may just be a temporarily failed connection. Exit and reopen the Main Menu to make Leaf try again.
- Leaf saves only the latest three WiFi networks, so older networks may need to be added again in WiFi Setup.
Leaf Web App
The Leaf Web App gives you a larger screen for tasks that are easier on a phone, tablet, or laptop: profiles, flight summaries, saved waypoints, route activation, and route building. The Web App runs directly on Leaf. For local features like profiles, route editing, and logbook viewing, internet access is not required.
Opening the Web App
- On Leaf, open Main Menu → Web App.
- Scan the QR code shown on Leaf, or type the displayed address into your browser.
- If Leaf is not on a local WiFi network, connect your phone or computer to the Leaf WiFi network first, then open the address shown on Leaf.
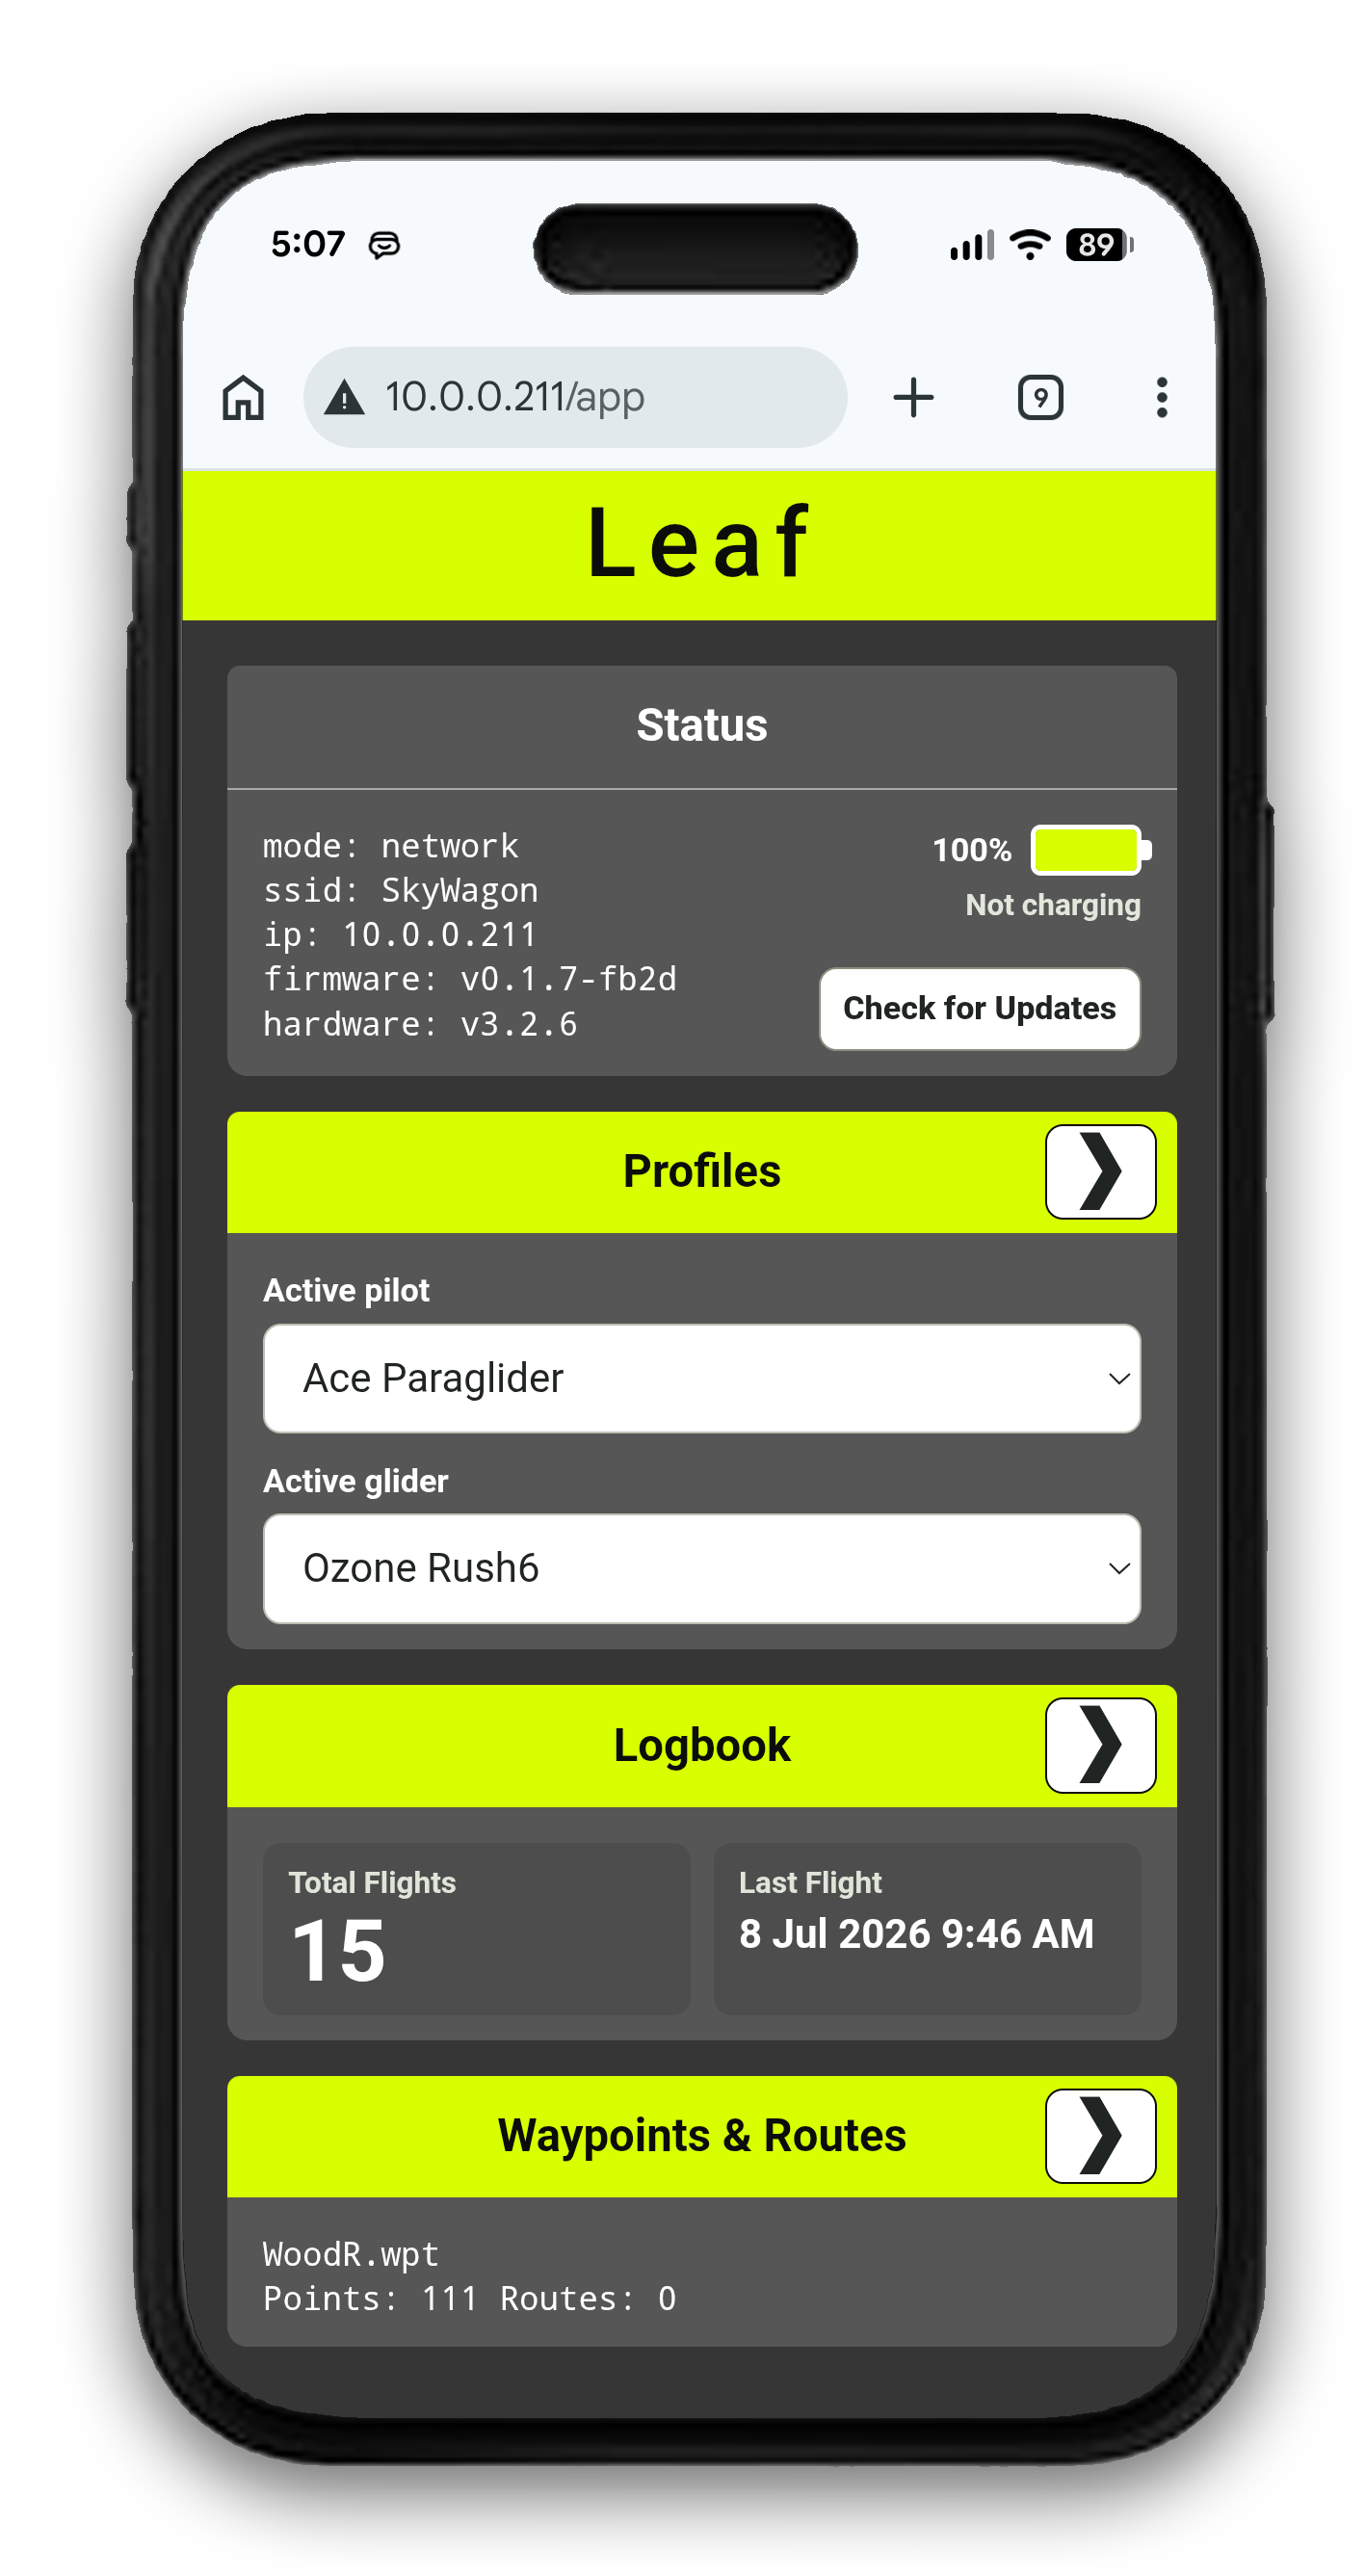
The first page of the Web App gives you a quick overview of Leaf:
- Leaf status: Check battery, WiFi, firmware, and SD card status. Firmware updates require a network with internet access.
- Profiles: Quickly select the active pilot and glider.
- Logbook: See a summary of recent saved flights.
- Navigation: See the waypoint file, points, and routes currently loaded.
Profiles
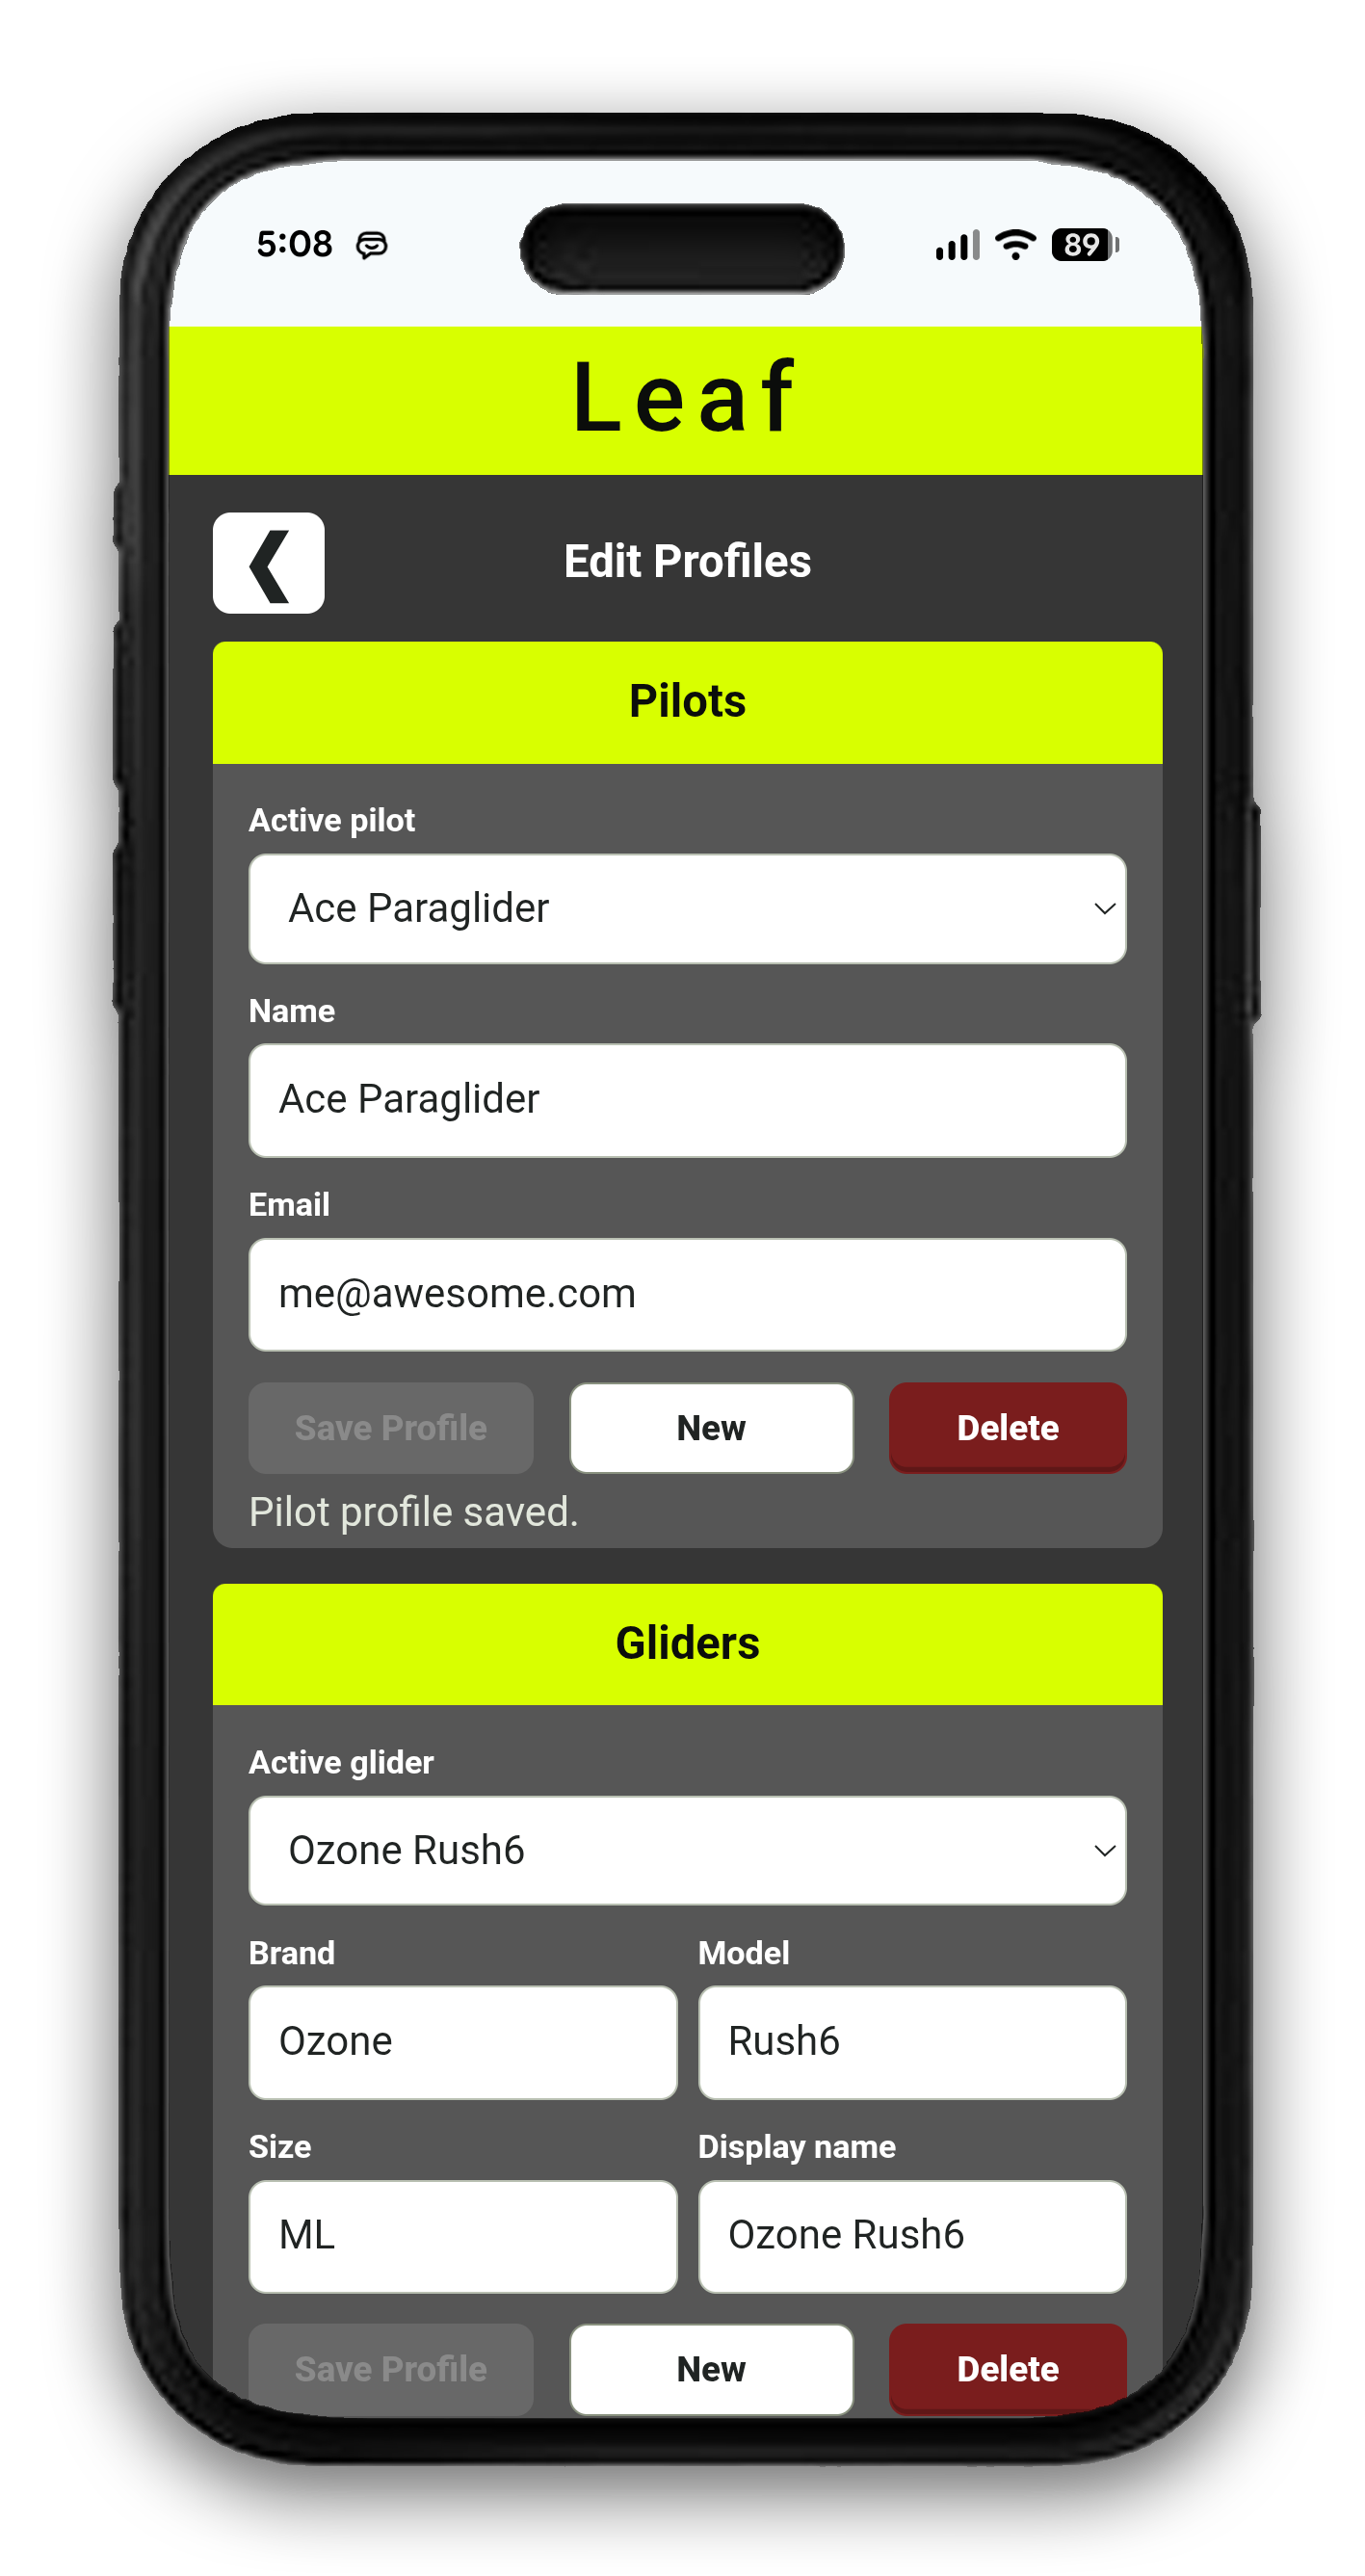
- Open Profiles to save pilot and glider details.
- Choose which pilot and glider are active before a flight.
- Selected pilot and glider details are included in the logbook and recorded in the IGC flight track file.
Logbook
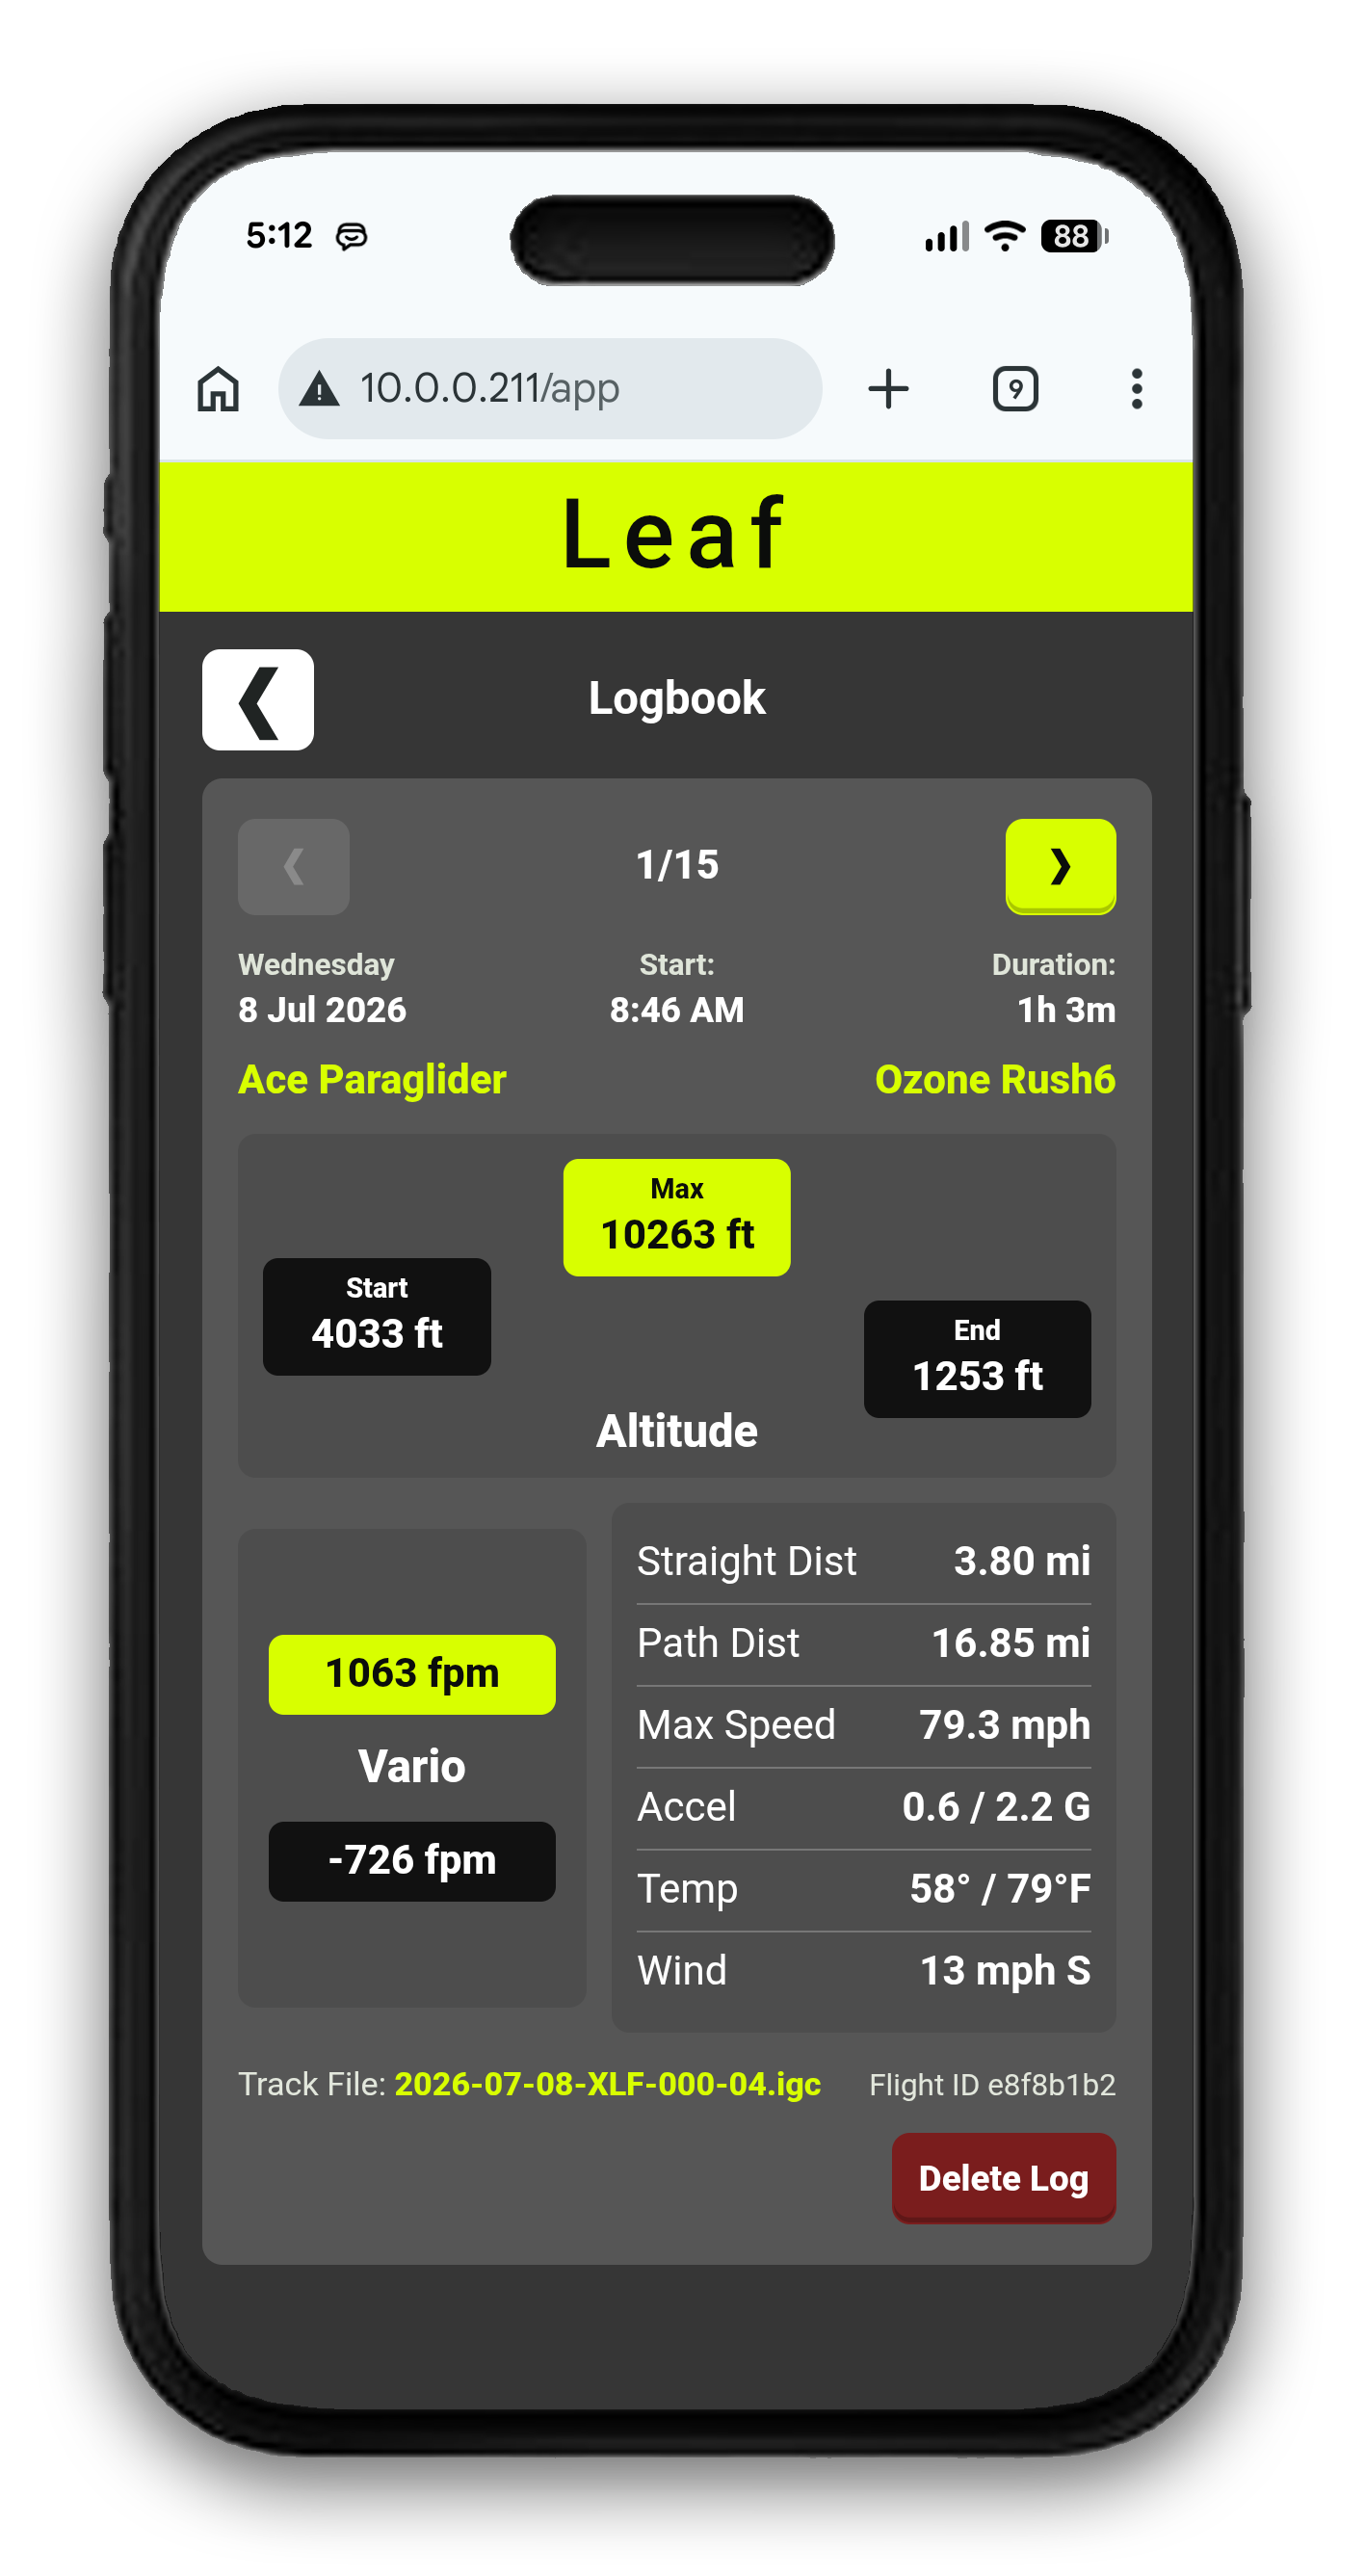
- Open Logbook to review saved flight summaries.
- Flight summaries include time, duration, altitude, vario, distance, speed, acceleration, and observed wind information when available.
- Deleting a logbook entry from the Web App also deletes the recorded IGC track file for that flight.
Loading Waypoints
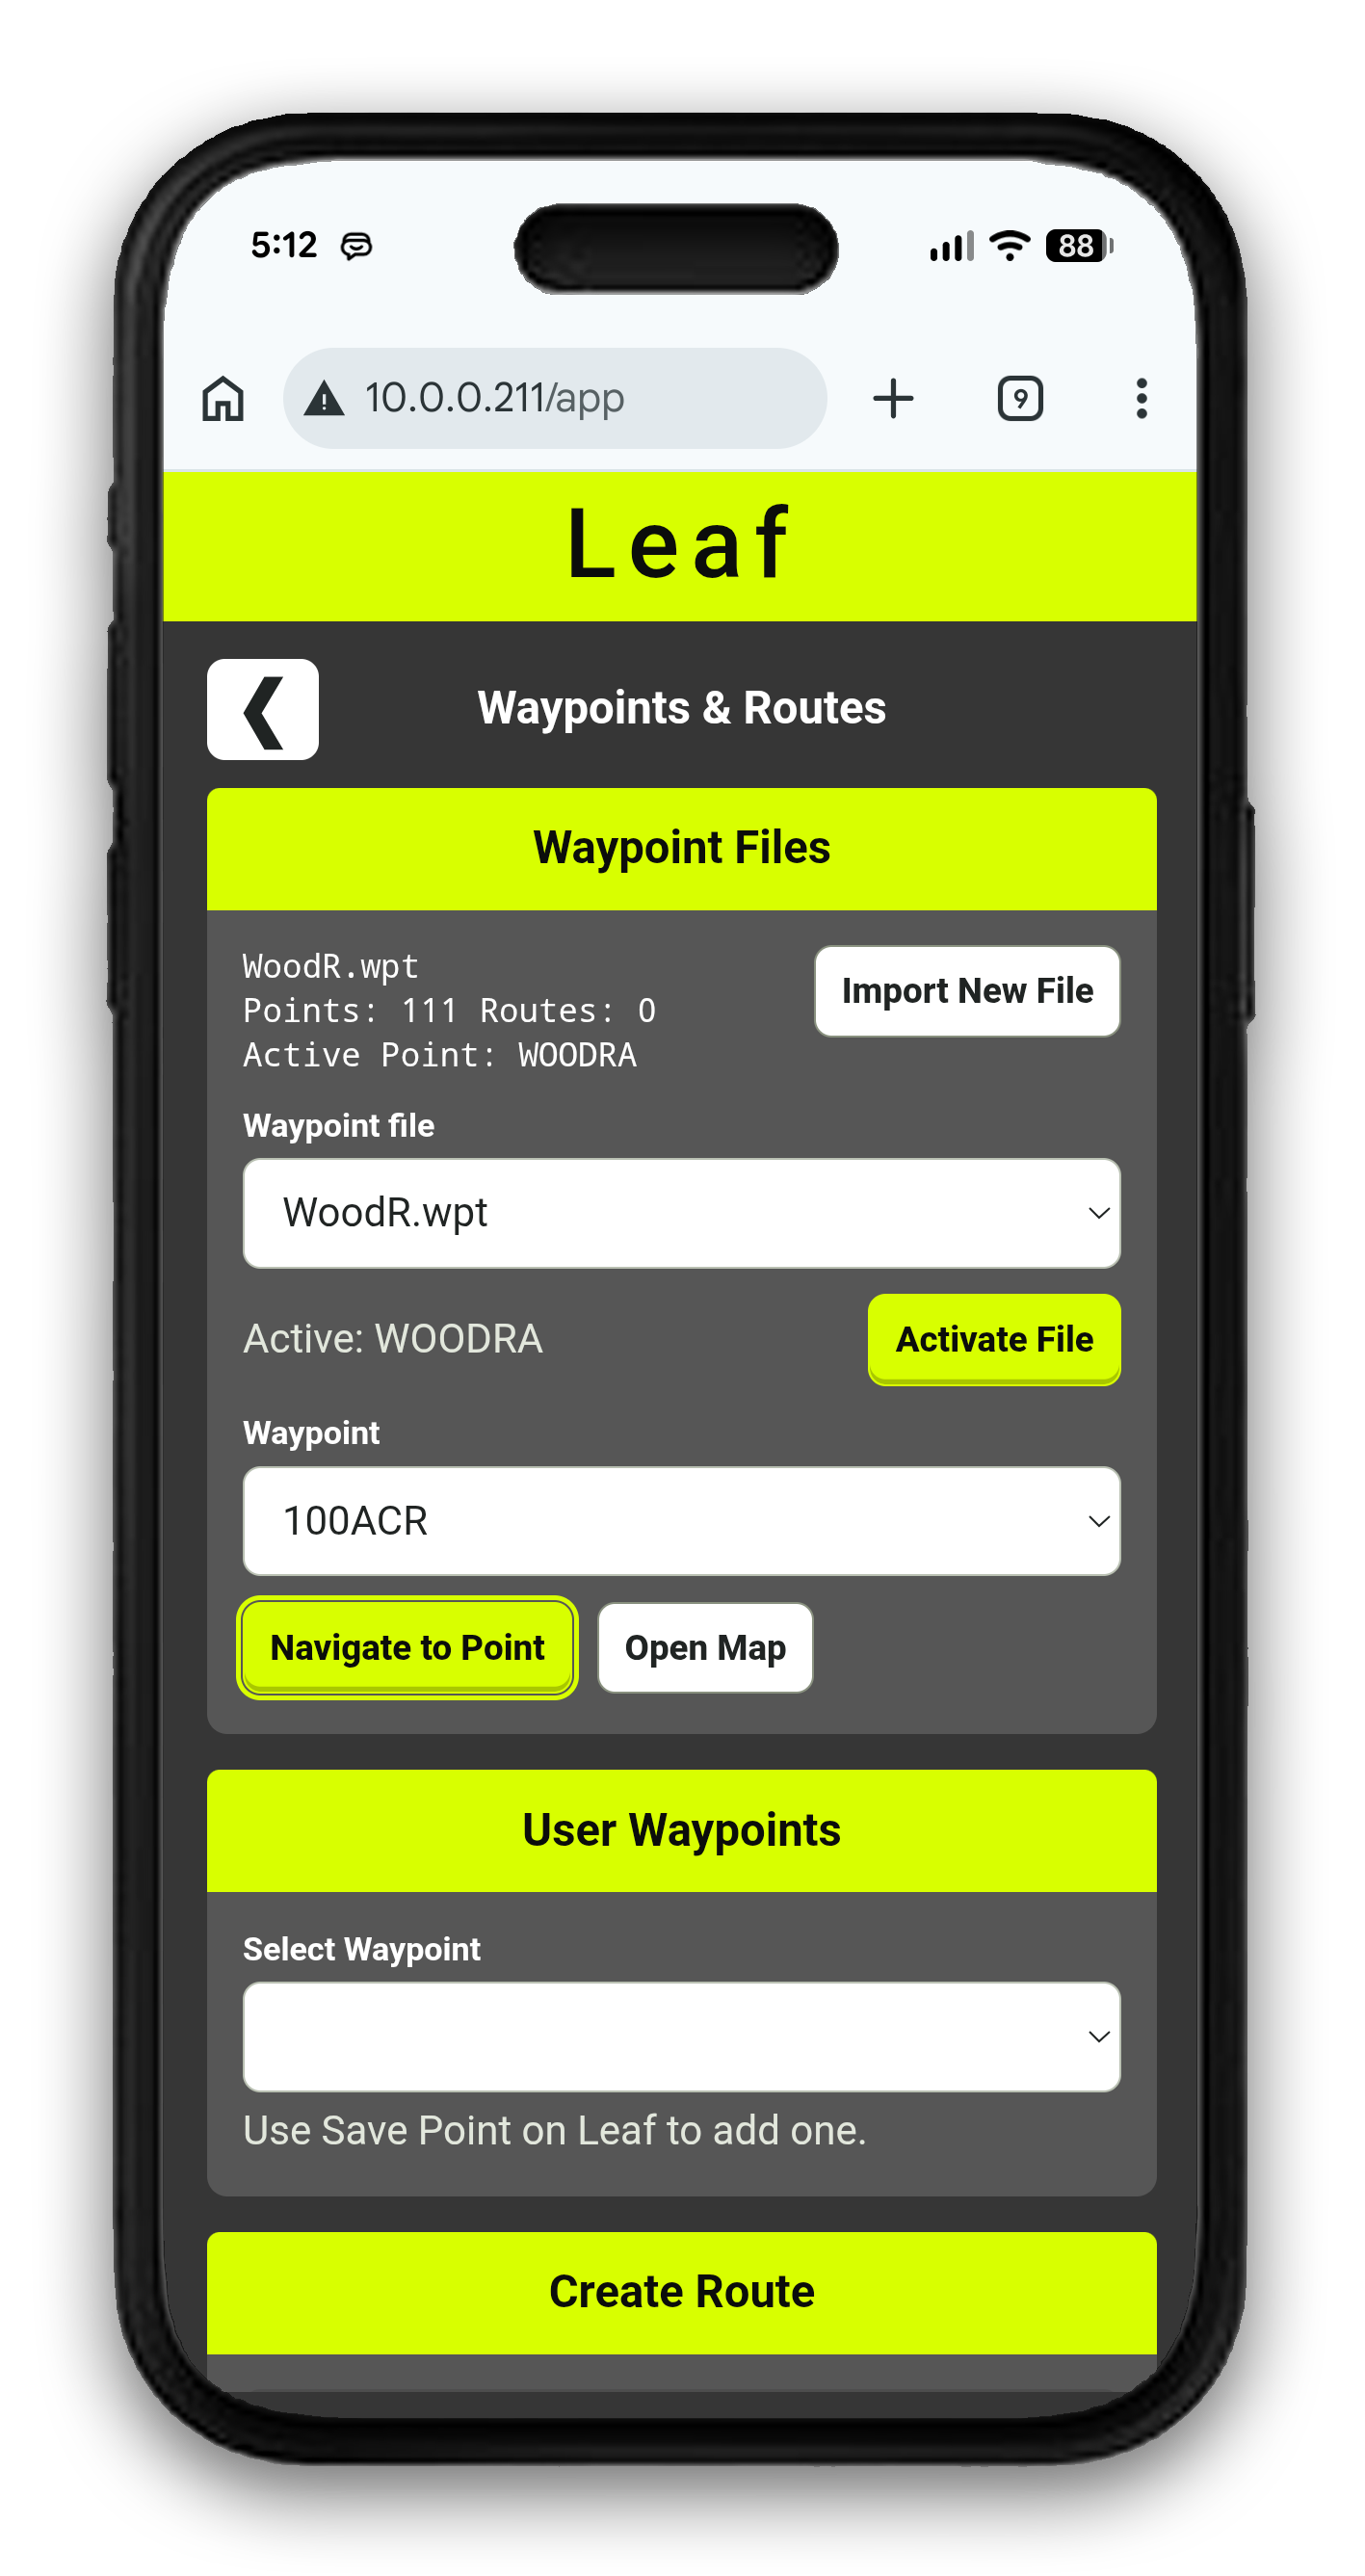
- Click Import New File to select a file from your phone, tablet, or computer, then upload and save it to Leaf.
- Select a saved waypoint file from the dropdown, then choose Activate File to load it for on-device navigation.
- Navigate directly to a saved point or open a point on a map.
- Rename saved user waypoints or delete points you no longer need. User waypoints are created on Leaf from Main Menu → Flight → Save Point.
Creating and Importing Routes
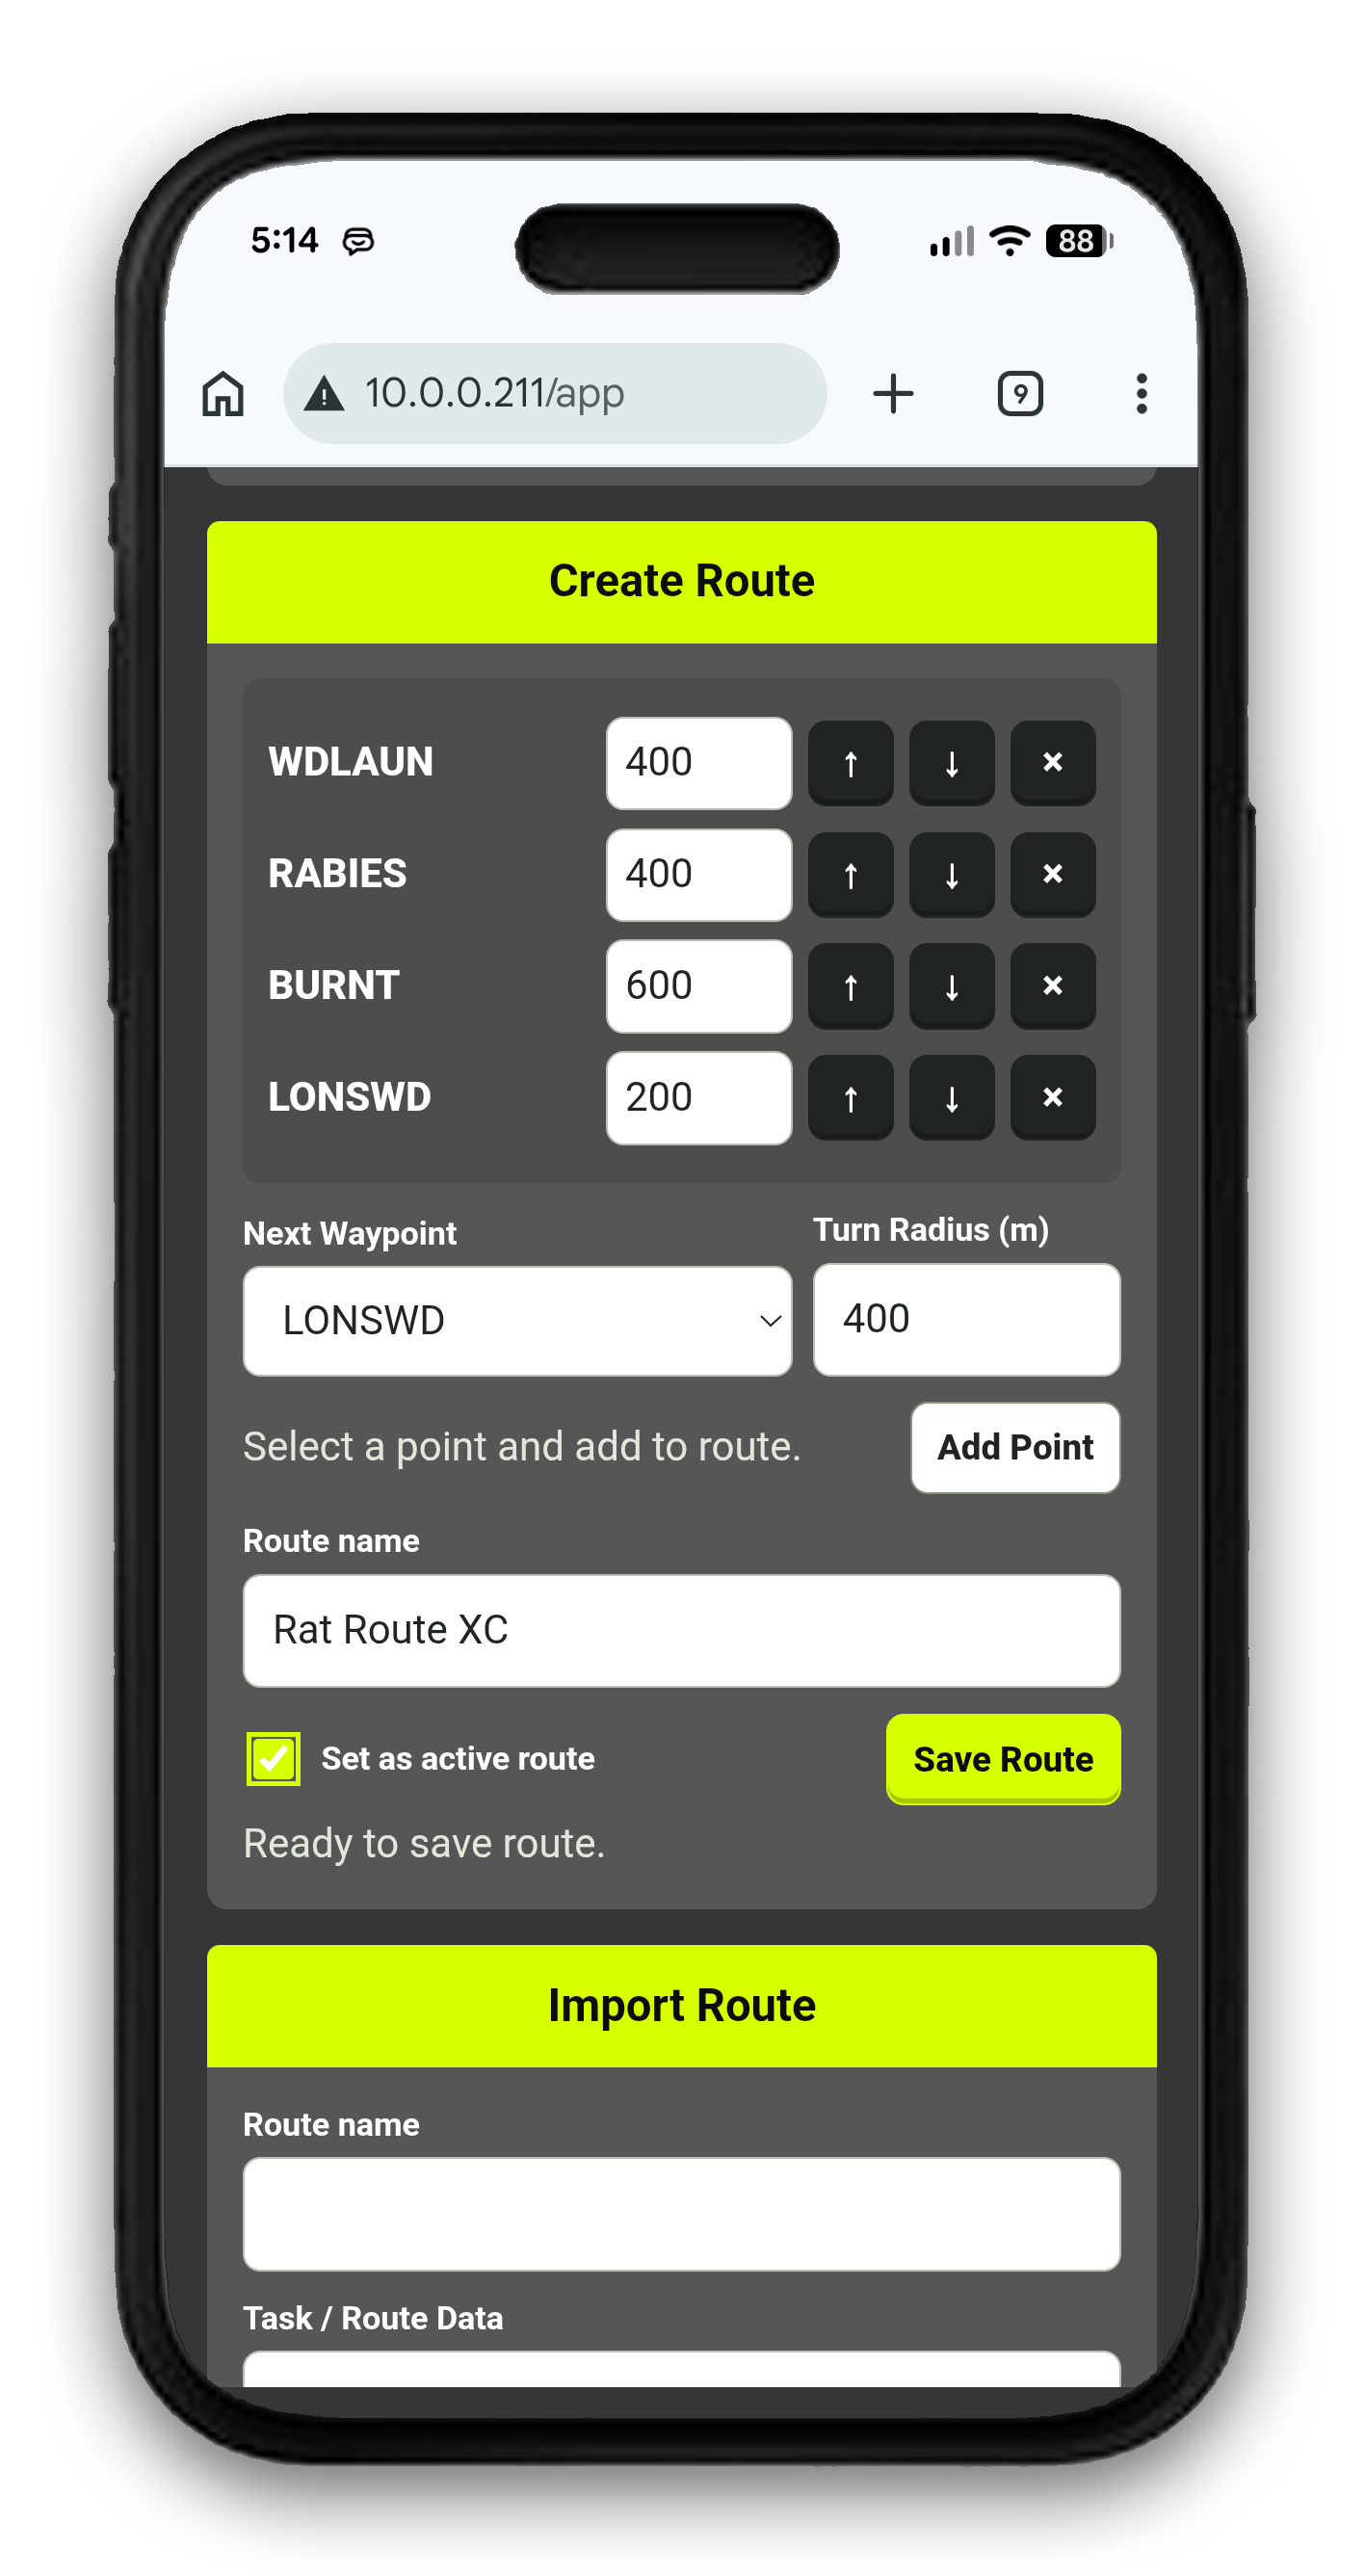
- You can create your own routes using waypoints from the loaded file.
- - Select a point, enter a turn radius, then click Add Point.
- - Once complete, give the route a name and click Save Route.
- - Leaf will save this route in the routes folder on the SD card.
- - If you checked the Set as active box, Leaf will activate this route immediately.
- Leaf can import routes from QR code data, which is common at paragliding events and competitions.
- - Use your phone’s camera app or photo gallery lens feature to extract the text from the QR code.
- - Paste the text into the Task / Route Data field.
- - If desired, check the Set as active route box.
- - Give the route a name, then click Save to Leaf.
Firmware Updates
Leaf can update to the latest firmware over WiFi. If you have not saved a network yet, follow Connect to WiFi first.
Updating a Leaf running firmware v0.1.7 or earlier? See legacy firmware update instructions for the older update process.
To check for updates, open Main Menu → Settings → System → Update FW on Leaf. Leaf will check for the latest firmware and restart when finished checking or updating.
If Leaf fails to check for updates, restart Leaf and try again.
If no WiFi network is available, you can still check for firmware updates using your phone’s hotspot and cellular connection. See Connecting to a Phone Hotspot.
Reloading Firmware Manually
WARNING Manually loading firmware is only for advanced users. For general updates, please use the firmware update process described above.
Make sure the firmware file matches your Leaf hardware version. For most users, this will be 3.2.7. Contact us if you are unsure.
There are two methods for manually loading firmware:
Flash firmware via the SD card
Plug Leaf into your computer with a USB cable. Leaf will appear as a removable drive showing the SD card contents. Copy the new firmware file into the firmware/ folder on the SD card, then unplug Leaf from the USB cable and reboot Leaf. During startup, Leaf will detect the firmware file and attempt to upgrade to the new firmware.
After the upgrade attempt, Leaf will create a status message inside the firmware/ folder so you can confirm whether the update succeeded or failed. When you are finished, it is okay to delete the firmware file and the status message from the SD card.
Flash firmware via USB cable and programming tools
For advanced users who wish to reprogram the firmware manually, the “Boot” button is located behind the smallest speaker hole. To enter bootloader mode, turn Leaf off, then press and hold the Boot button while plugging in the USB cable, then release the Boot button. Or, while already plugged into USB, press and hold the “Boot” button then press and release the “Reset” button, then release the “Boot” button. Once in bootloader mode, the firmware can be uploaded using Arduino, PlatformIO, or Espressif tools.
Troubleshooting
Having WiFi connection issues? See WiFi Troubleshooting in the Connect to WiFi section.
Restore Factory Defaults
To return all settings to the factory configuration, go to Menu → Settings → System, then scroll down to the Reset option. Hold the center button to reset all Leaf settings. This will reset Leaf settings and saved WiFi networks, but it will not erase your SD card, logs, pilot or glider profiles, or saved waypoints/routes.
Hard Reset Leaf
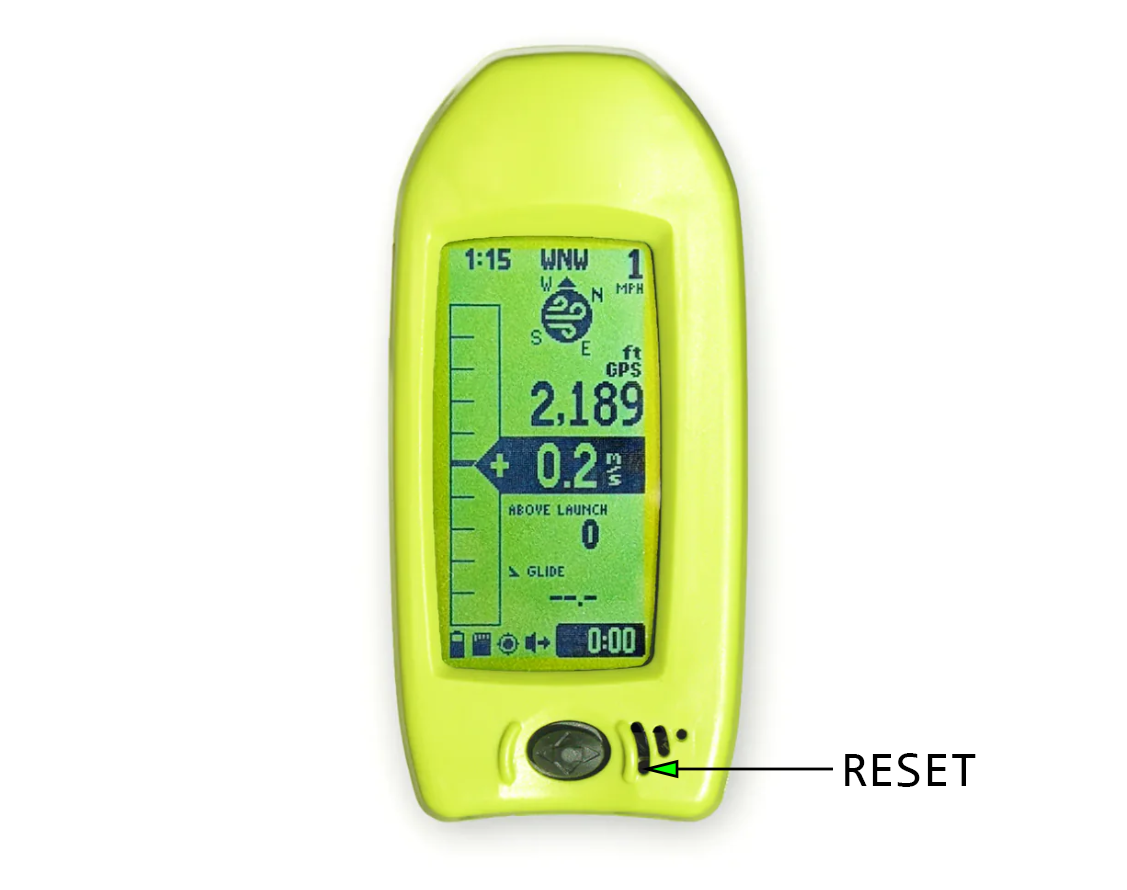
Performing a hard reset is useful if Leaf becomes frozen or unresponsive. The reset button is hidden behind the speaker grille. Press a paperclip or pin into the lower-end of the largest speaker slot to hard reset Leaf. This will force a reboot, but it won’t reset your user settings or touch your SD card. After you reset Leaf, you will need to turn it on again if it wasn’t plugged into a USB cable at the time.
Contact Us
Have questions, feedback, ideas, or flight stories? We would love to hear from you.